Seamless Data onboarding with CrowdStrike Falcon Next-Gen SIEM and Cribl via CrowdStream

CrowdStrike Falcon Next-Gen SIEM offers a cutting-edge approach to threat detection, investigation, and response. Traditional SIEMs, which rely on collecting and analyzing logs from IT systems to detect security incidents, often struggle with scalability, latency, and maintaining data integrity—critical challenges for today’s fast-paced security teams. With Falcon Next-Gen SIEM, you can overcome these challenges by leveraging its cloud-native architecture, advanced analytics, and AI to deliver efficient, scalable, and intelligent security monitoring.
Cribl and CrowdStrike: Enhancing SOC Efficiency
Since 2021, Cribl has partnered with CrowdStrike to empower customers to collect, transform, and route data for optimized security operations. With CrowdStream, you can now integrate directly with Falcon Next-Gen SIEM, enabling seamless routing of critical security and IT data. This capability enhances threat detection and accelerates SOC modernization.
In this blog, we’ll walk you through configuring CrowdStream to ingest logs from Microsoft Blob storage and demonstrate how to leverage those logs in Falcon Next-Gen SIEM for enhanced threat detection and response. Blob storage offers a reliable, scalable, and cost-effective solution for managing large volumes of unstructured data, such as logs, with use cases including intrusion detection and forensic analysis
Setting up data flow using CrowdStream can all be done from CrowdStrike Falcon Next-Gen SIEM. Lets show you how:
First, let’s set up the Cribl connector. Log in to CrowdStrike Falcon Next-Gen SIEM.
The Cribl data connector enables seamless integration of data from various sources into CrowdStrike Falcon Next-Gen SIEM via CrowdStream.
Navigate to the Data Onboarding section.

On the Data sources page, search for the Cribl Data Connector.

In the Add new connector page, select a Vendor, select a Product, enter a Connector name, and enter a Description (optional). In the Parser details, choose from existing parsers or Create a new parser. Acknowledge the Terms and Conditions. Select Save.


The connector will begin initializing.
When the connector is ready, click the Generate API key option in the banner.
Copy the API key and API URL. These will be referenced when setting up the CrowdStream destination.
In the main menu, select Next-Gen SIEM, then CrowdStream.
Setting up source data collection in CrowdStream
Next, let’s use CrowdStream to define the data we want to collect and determine how we want to process it.

CrowdStream supports a variety of methods for collecting data. Its QuickConnect visual UI allows you to configure data collection with ease by connecting inputs (Sources) to outputs (Destinations) using a simple drag-and-drop interface.
To enhance functionality, you can insert Pipelines or Packs into these connections, enabling you to leverage CrowdStream’s robust data-transformation Functions. Alternatively, you can bypass these processing stages entirely, routing incoming data directly to Destinations with minimal setup required.

Let’s utilize QuickConnect to configure CrowdStream for retrieving logs stored in Microsoft Blob Storage. Here’s an example of what the configuration process looks like:

Once the retrieval of logs from Microsoft Blob Storage is configured, the next step is to set up the target configuration.
Beyond simple routing, CrowdStream empowers you to manage, process, and shape your data. Positioned between your data sources and destinations, CrowdStream enables you to collect, filter, clone, and transform your data before routing it to designated destinations such as CrowdStrike Falcon Next-Gen SIEM.
Note:Ensure that the parser configured in the Cribl Connector is compatible with the data format being sent. If using the default out-of-the-box parsers available with Next-Gen SIEM, it is recommended not to modify the original log message format and to limit processing to filtering and obfuscation only.
For comprehensive prerequisites on importing data from Microsoft Blob Storage, refer to the Cribl documentation.
Setting Up the New CrowdStrike Falcon Next-Gen SIEM Destination in CrowdStream
Now that we’ve set up the connector and configured data collection, we’re ready to send our blob data to Falcon Next-Gen SIEM.
Login to CrowdStream, and select the Worker Group. Select Data > Destinations.

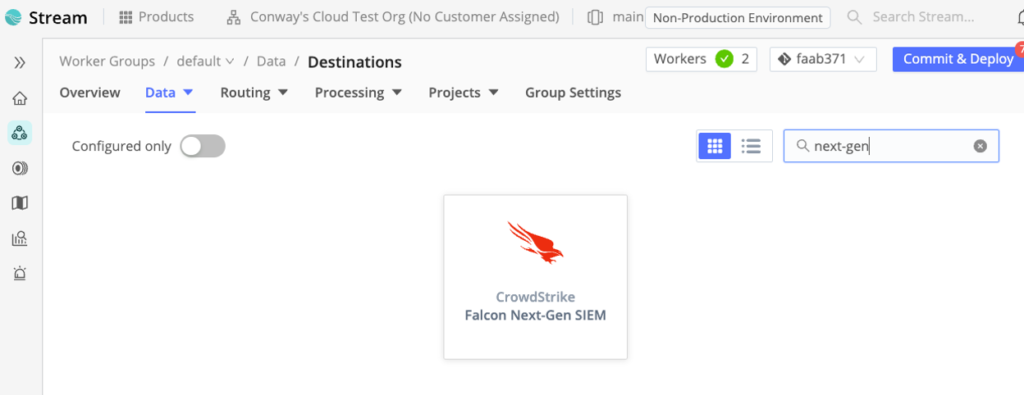
Search or scroll to the CrowdStrike Falcon Next-Gen SIEM tile. Click the tile and select Add Destination.

- Enter the Output ID: Provide a unique identifier for the output configuration.
- Specify the Endpoint: Input the Next-Gen SIEM endpoint, the same one used during the Cribl connector setup.
- Select an Authentication Method: Choose your preferred method of authentication and enter the auth token.
- Save the Configuration: Click Save to confirm your settings.
- Commit and Deploy: Finalize the setup by selecting Commit and Deploy to activate the changes.
Testing the Connection
After committing and deploying the configuration in CrowdStream:
Check the status of the CrowdStrike Falcon Next-Gen SIEM destination.
A successful connection will change the destination’s status indicator from blue to green within the CrowdStream interface.

Click anywhere in the destination line item to see Destination details.
Testing the Configuration in CrowdStream
- Navigate to the Test Tab:
- Open the Test tab to begin testing the configuration.
- Select an Event Sample:
- By default, a sample event will be preloaded.
- To test with other samples, use the Select Sample dropdown to choose an alternative event sample.
- Run the Test:
- Use the default event sample or your selected sample and click Run Test.
- Check the Status Message:
- Observe the status message displayed at the bottom of the page:
A green status indicates successful authentication and successful transmission of data from CrowdStream.

Log into CrowdStrike Falcon Next-Gen SIEM.

In CrowdStrike Falcon Next-Gen SIEM, select Event search from the menu.

In the Source dropdown, select Third Party to specify the external data source you want to query. After making your selection, click Run query to execute the search. Once the query runs successfully, events from the selected source will populate in the results.
You can click on an individual event to view detailed information, including metadata, timestamps, and any associated alerts or activity logs. From here, you can use the powerful features of the CrowdStrike Falcon Next-Gen SIEM to search through your data, aggregate it based on key attributes like source or severity, and create visualizations to gain deeper insights into your environment.
This streamlined process helps you effectively analyze and act on third-party event data within the Falcon platform, enhancing visibility and incident response capabilities.
Additional Resources
- Check out technical documentation: See the Falcon Next-Gen SIEM User Guide, including information about third-party data ingestion.
- Start onboarding data today: Take the Falcon Next-Gen SIEM fundamentals course (CrowdStrike University subscription required) and watch these Falcon Next-Gen SIEM intro videos.
- Watch demo videos: Learn how to detect, investigate and stop threats with Falcon Next-Gen SIEM by viewing fast-paced demos.
Read the Cribl and CrowdStrike Falcon Next-Gen SIEM Solution Brief

