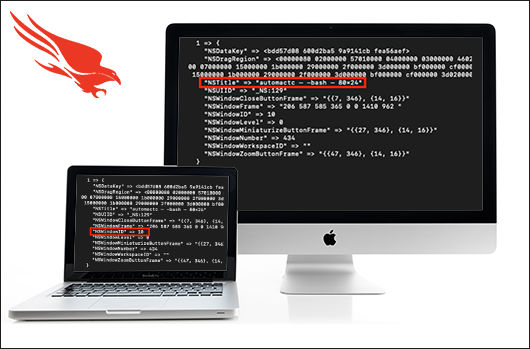
In Mac OSX Lion (10.7), Apple introduced a feature called “User Interface (UI) Preservation”, intended to save the state of application windows and restore them upon future launches. Like many features intended to enhance the user experience, UI Preservation can also provide immense forensic value to an investigator. In the case of anti-forensic measures taken by an adversary, for example, such as disabling the creation of or deleting the standard Terminal history files, the scrollback history for Terminal.app can still persist via UI Preservation. This blog discusses the significance of macOS Terminal saved state files and how to reconstruct these files to identify additional adversary activity during interactive sessions.
CrowdStrike AutoMacTC
CrowdStrike has developed a new module for its open-source Mac forensics triage tool, AutoMacTC, which has the ability to automatically parse the Terminal saved state files on both live systems and forensic images. You can find the AutoMacTC tool in our public Github repo. The following sections detail the structure of the Terminal saved state files as well as a step-by-step breakdown of the process to manually reconstruct the associated Terminal sessions.
Saved State Final Analysis
When an application has UI Preservation implemented, a directory is created when a user runs the application. The per-application directory path for this activity is /Users/<user>/Library/Saved Application State/<application name>.savedState/. This per-application directory will typically contain the following files:
windows.plistdata.data- One or more files named
windows_*.data,with a number following the underscore character
The created timestamp associated with each directory and constituent files provides evidence of the first time the application was ever used, while the modified time indicates the most recent usage. Our interest, however, is in the contents of two files: windows.plist and data.data, specifically those found under /Users/<user>/Library/Saved Application State/com.apple.Terminal.savedState/.
Windows.plist
The file windows.plist is a binary property list (plist) file that can be parsed with the native macOS command-line tool plutil or opened with XCode. With the command plutil -p windows.plist, the contents can be viewed in human-readable form, an example of this can be seen in Figure 1.
 Figure 1: Example data contained in windows.plist — NSTitle highlighted
In this example, one field immediately stands out: NSTitle, which includes the title of the Terminal window (automactc, indicating the current working directory), the name of the shell in use (bash), and the size of the window (80x24). The fields NSWindowID and NSDataKey will be valuable for analysis of data.data.
PersistentUIRecord
The file data.data can contain multiple PersistentUIRecord sections, each prefixed with the NSCR header and followed by an AES-128-CBC encrypted blob. The Stack Exchange user “cimarron” was able to decode the format of each PersistentUIRecord section, as shown in Figure 2.
| Offset (hex) | Value |
| 00-03 | Magic ('NSCR' for PersistentUIRecord) |
| 04-07 | Version (either '1000' or '0006') |
| 08-0B | NSWindowsID (used to lookup 128-bit AES key stored in windows.plist) |
| 0C-0F | Record length (including from 0x00 to xxx) |
| 10-xxx | Encrypted binary plist data |
Figure 2: Structure of a PersistentUIRecord section The NSWindowID value from windows.plist can be used to identify a matching
PersistentUIRecord section of data.data. The NSWindowID value in the example windows.plist file is 10, as shown in Figure 3.
 Figure 3: Example data contained in windows.plist — NSWindowID highlighted
The NSWindowID value in each PersistentUIRecord section of data.data is stored as an unsigned big-endian INT value. The NSWindowID value from the PersistentUIRecord that corresponds with windows.plist in Figure 3, 0xA, is shown in Figure 4.
Moreover, the NSWindowID value can be used to identify the AES-128-CBC key necessary to decrypt the encrypted binary plist data stored in the corresponding PersistentUIRecord section from data.data. The hex-encoded AES-128 key is stored in the NSDataKey field in windows.plist, as shown in Figure 5.
 Figure 5: Example data contained in windows.plist — NSDataKey highlighted
The record length at offset 0x0C-0x0F is stored as an unsigned big-endian INT value and it reflects the length of a full PersistentUIRecord section (starting at offset 0x00) in data.data. The encrypted binary plist data begins at offset 0x10, with its end denoting the end of the PersistentUIRecord section.
 Figure 6: Structure of example data.data PersistentUIRecord. The NSCR header is in yellow, version in green, NSWindowID in blue, and record length in orange
Decrypting the binary plist data with the AES-128 key from the NSDataKey in windows.plist results in a file that contains a NSKeyedArchiver-format binary plist. The beginning of the file structure for this artifact is described in Figure 7.
| Offset (hex) | Value |
| 00-14 | _NSWindowrchv header |
| 15-18 | Plist length |
| 19-xx | Binary plist data |
| xx-end | Padding bytes |
Figure 7: Decrypted binary plist data file structure
Deserializing the NSKeyedArchiver Format plist
The next step is to deserialize the NSKeyedArchiver-format binary plist, which can be extracted from the file starting at offset 0x19, exclusive of the padding bytes. The command plutil -p can be used to view the plist in human-readable form. As shown in Figure 8, $top indicates that the contents of TTWindowState are available in key 1 of $objects.
 Figure 8: Example
 $topAs shown in Figure 9, key 1 of $objects contains two sub-keys, NS.Keys and NS.Objects, with associated key/value pairs. Sub-key 0 from NS.Keys has a value of 2, which maps to “Window Settings”. The associated sub-key 0 from NS.Objects has a value of 8; key 8 contains only one object, with a value of 9.
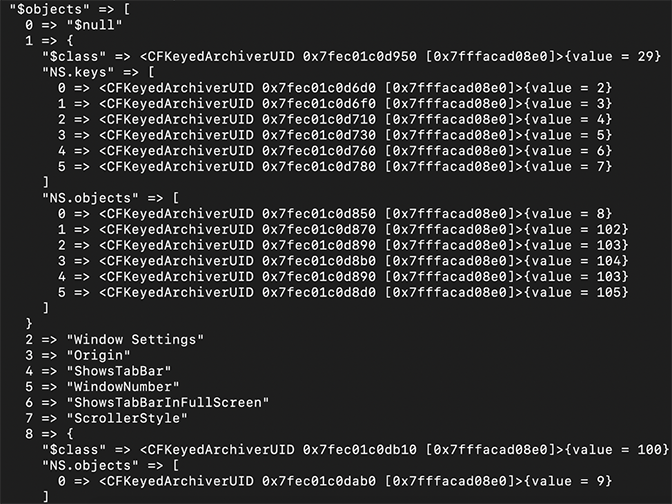 Figure 9: Example of key 0-8 in
 $objectsIn the example shown in Figure 10, key 9 from $objects contains several key/value pairs, but the data for the following sub-keys under NS.objects is the most pertinent to forensic analysis:
- Sub-key 2 (“Tab Working Directory URL”) → Value 21
- Sub-key 3 (“Tab Working Directory URL String”) → Value 22
- Sub-key 6 (“Tab Contents v2”) → Value 30
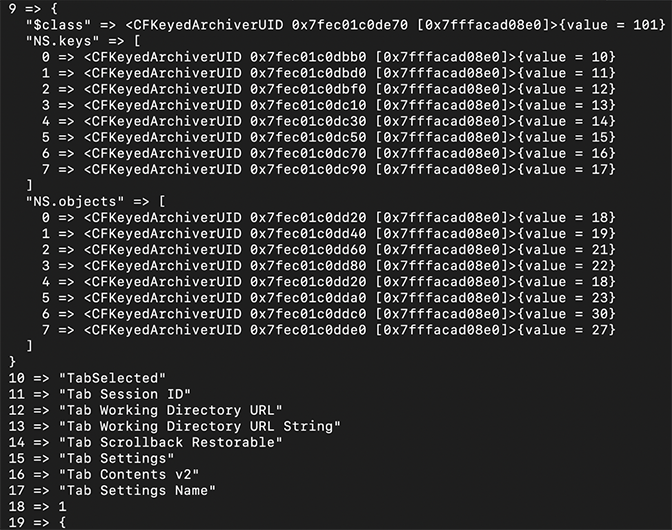 Figure 10: Example key of 9-19 in
 $objectsIn this example, the values at keys 21 and 22 in $objects, as shown in Figure 11, reflect the current working directory for the Terminal tab in question. Both values should be very similar.
$objectsThe value at key 30 however, associated with “Tab Contents v2”, contains a set of objects — this data is the most relevant to reconstructing commands from Terminal sessions. In key 30, the values of the NS.objects sub-keys correspond to keys in $objects. For example, the value at sub-key 0 in Figure 12 maps to the data in key 31.
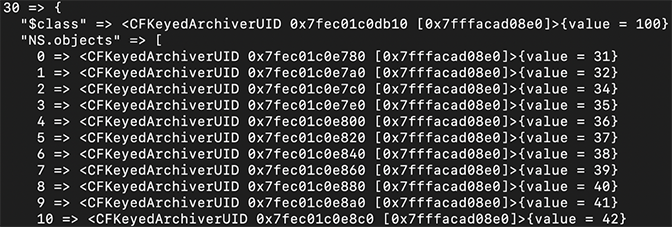 Figure 12: Example of key 30 in
 $objectsFigure 13 shows the hex-encoded value at key 31.
$objectsDecoding the hex-encoded value shows the beginning of the user’s Terminal session: Last login: Thu Aug
8 11:15:54 on ttys000 This process can be repeated for the other NS.objects sub-keys in key 30 to rebuild the full terminal session.
Other Considerations
It is important to note that this scrollback history does not have timestamps and may be overwritten by normal user behavior if not collected early enough in an investigation. Moreover, an adversary may eliminate scrollback history entirely by unchecking “Restore text when reopening windows” in the Terminal.app settings, as shown in Figure 14.
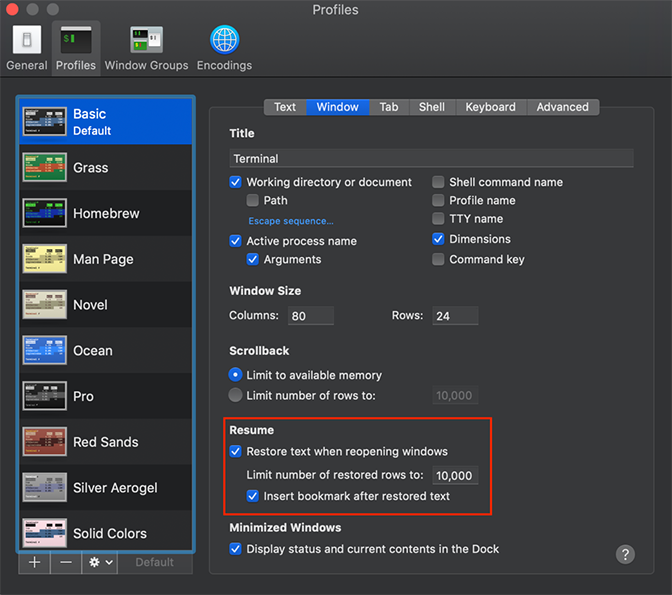 Figure 14: Terminal.app settings
Conclusion
The full contents of multiple Terminal tabs can be recreated by iteratively decrypting and extracting embedded plists from data.data and using the AES keys provided in windows.plist. This level of visibility into Terminal scrollback history can be critically important to forensic investigators as they work to reconstruct Terminal history from interactive adversary sessions. Forensic investigators frequently face situations in which command-line history from either system logs or a real-time monitoring tool is unavailable. Even if an adversary has used the unset HISTFILE command to disable command-line logging, or deleted logs from the system, scrollback history may still be available for analysis.
Additional Resources
- Access the CrowdStrike AutoMacTC tool in our public Github repo.
- Learn how CrowdStrike can help your organization answer its most important security questions: Visit the CrowdStrike Services web page.
- Download the “2018 CrowdStrike Services Cyber Intrusion Casebook” and read up on real-world IR investigations, with details on attacks and preventative recommendations.
- Download the 2020 CrowdStrike Global Threat Report.
- Learn more about CrowdStrike’s next-gen endpoint protection by visiting the Falcon platform product webpage.
- Test CrowdStrike next-gen AV for yourself: Start your free trial of Falcon Prevent™ today.


![Helping Non-Security Stakeholders Understand ATT&CK in 10 Minutes or Less [VIDEO]](https://assets.crowdstrike.com/is/image/crowdstrikeinc/video-ATTCK2-1)
![Qatar’s Commercial Bank Chooses CrowdStrike Falcon®: A Partnership Based on Trust [VIDEO]](https://assets.crowdstrike.com/is/image/crowdstrikeinc/Edward-Gonam-Qatar-Blog2-1)


